Long White Gypsy uses affiliate links and is a member of the Amazon Services LLC Associates Program. If you make a purchase using one of these links, I may receive a small commission at no extra cost to you. See my Privacy Policy for more information.
New Zealand’s Great Walks are designed to make some of our most scenic and beautiful regions accessible for even the most inexperienced trampers.
Each Great Walk is more well maintained and serviced than other backcountry tramping tracks in the trail network that covers New Zealand.
But this doesn’t mean you’ll find the Great Walks any easier or that they’ll be any less dangerous. It’s still possible to get lost, injured or worse on a Great Walk, so you need to choose carefully and plan accordingly.
The following 8 tips for how to choose a Great Walk are designed to help you have a safe and comfortable adventure.
1 — Assess You & Your Group’s Capabilities
Before you even consider putting foot to trail, you need to think about your capabilities.
How much experience do you have tramping for 3 to 5 days through sometimes demanding terrain whilst carrying a heavy pack? Have you done any previous overnight trips? How fit are you?
If you or any member of your group is a complete beginner, starting with a Great Walk that has a lot of elevation gain or is particularly susceptible to bad weather (e.g. the Milford or Kepler tracks) may not be a good idea.
Beginner trampers should follow the guidance given in the Hiking for Beginners section of this website (specifically How to Prepare for a Great Walk) and build up to one of the easier Great Walks such as the Abel Tasman or Lake Waikaremoana tracks.
8 Questions to Assess your Tramping Capabilities
- What is the fitness level of the group members?
- How experienced are you/your group with tramping for multiple days with a heavy pack?
- What kind of terrain is involved and do you/your group have experience in that terrain?
- Do you/your group have any physical handicaps which might prevent you/them from tramping the proposed distances between huts/camps whilst carrying a heavy pack?
- Does your itinerary cater to all people in the group?
- Could you/your group’s lack of experience put anyone in your group (or any other person e.g. SAR teams) in danger?
- If hiking solo, what are your weaknesses?
- Who are the least experienced members of your group? Can other group members make up for their lack of experience, or will it create a dangerous situation?
2 — Research the Track and Design an (Appropriate) Itinerary.
Once you’ve selected a Great Walk that suits you and/or all members of your group, you can begin the exercise of planning out each day of your adventure.
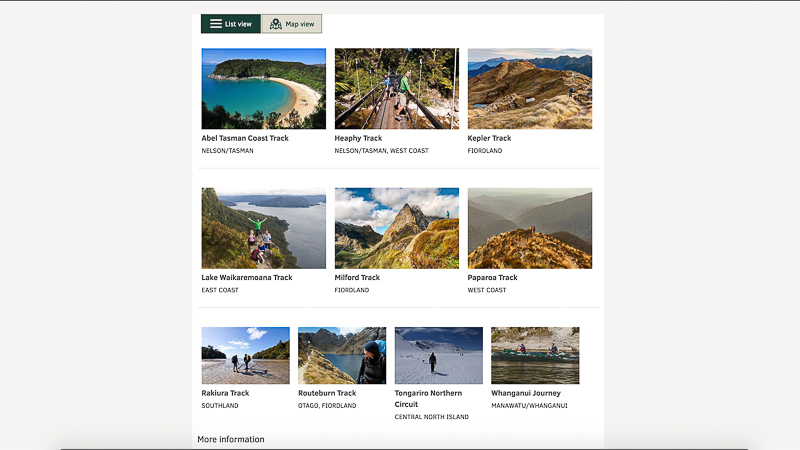
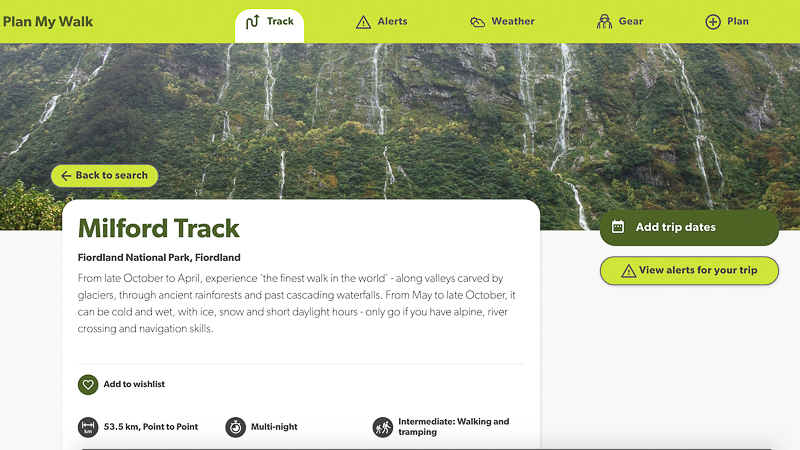
There are plenty of online resources to help you plan your Great Walk, not least of which the Great Walks section of this site, the Department of Conservation Great Walks website and Mountain Safety Council’s Plan My Walk app and website.
Plan My Walk incorporates all of the Great Walks in an easy-to-use interactive tool for planning the logistics of your journey (including notifying your emergency contacts of your intended route).
Both Mountain Safety Council and the Department of Conservation’s websites are the official sources and should be used as your primary source of information.
Although private blogs (such as this) sometimes provide more detail on different sections of the track or things to do and see along the way, they could be out of date or inaccurate.
To ensure you’re getting accurate and up to date information, contact the local DOC Visitor Centre for current track conditions and facilities. Always check in with the Visitor Centre before you head out regardless of your experience level, just in case of any last minute changes.
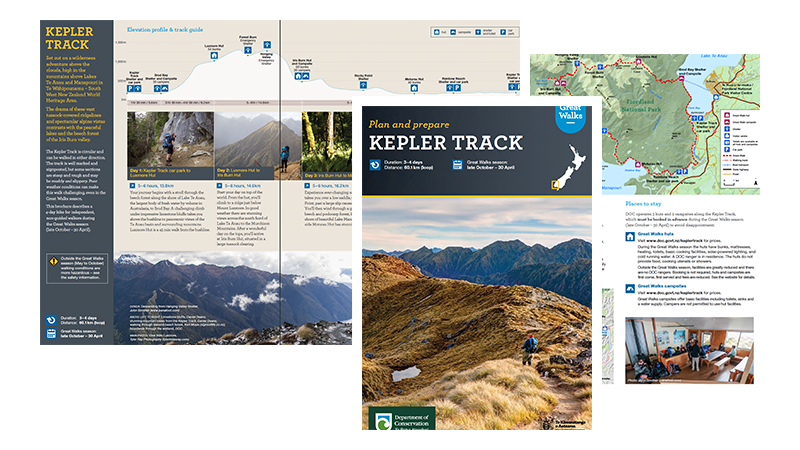
Each Great Walk has its own downloadable brochure (usually available underneath the map image on the DOC website page) containing:
- a map of the track (showing huts, campsites & toilets);
- an elevation profile; and
- a proposed itinerary (showing distances/times between stops).
The example itinerary in these brochures is structured to suit a typical Great Walk tramper of the kind the track has been designed for.
Itineraries for easier Great Walks like the Abel Tasman Coast Track or Rakiura Track are designed around average trampers (even younger children) who are capable of walking 4 to 5 hours per day through moderate terrain.
Itineraries for harder Great Walks like the Milford Track or Kepler Track are designed for more experienced trampers who are capable of walking for 6 to 7 hours most days of the trip.
Be sure to plan an itinerary which suits you and your group and which everyone is comfortable with.
On some tracks (such as the Heaphy Track) it might be possible to combine two short days together into one longer day. This may suit some trampers but not others, so assess fitness, experience and capability early.
6 Questions to Help Plan Your Great Walk
- Are you/your group capable of covering the entire distance of the track over the stated number of days?
- Are you/your group capable of walking for the stated number of hours or kilometres every day?
- Can you still make it to your planned destination if you/your group are affected by drastic changes in elevation (e.g. mountain climbs or going up/down steep or narrow staircases).
- Can you/all members of your group safely achieve the stated walking times in daylight hours, with a full pack across the expected terrain?
- If each section takes much longer than anticipated (e.g. because of weather) can you/your group continue tramping for up to another 2 hours each day if required?
- Are there any hazards along the way which might slow you/your group down (e.g. because of lack of experience, weather etc.)?
3 — Check the Track Grade & Terrain
Part of your planning should be finding out what to expect on each track.
Most Great Walks are intermediate grade and can be achieved by most with caution and care. But don’t underestimate whether you/your group have the necessary skills to navigate and traverse the terrain.
Reading trip reports, blogs and even watching videos can help prepare you for what the track will be like. I highly recommend Mountain Safety Council’s Tramping Video Series. Although they only have videos for some of the more technical Great Walks at present, their focus is on drawing attention to the most technical bits of our most popular Great Walks and ensuring trampers are well prepared.
Here’s an example of the Milford Track video so you can see for yourself:
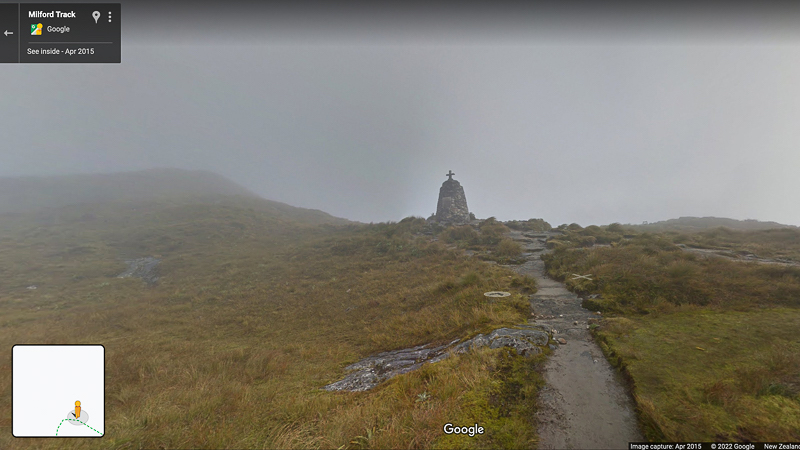
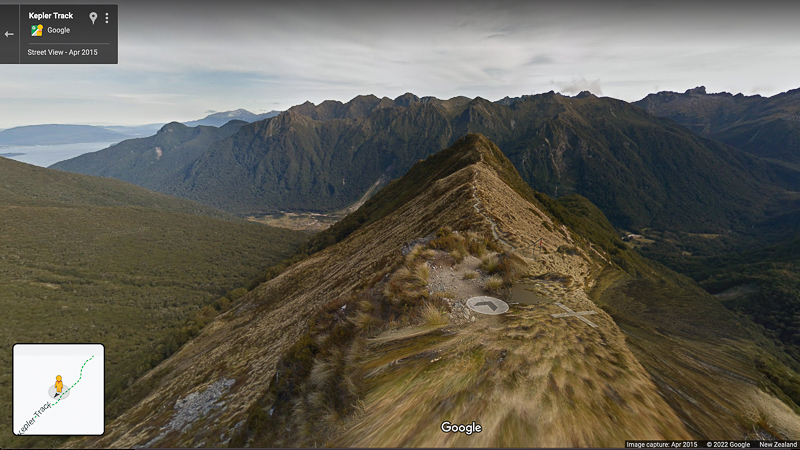
Some of our most popular Great Walks have been mapped by Google Earth. This is a fantastic way to get a real feel for the track (especially tricky sections) so you know what you’ll be up against.
Simply search the track name on Google Maps, and use the ‘Street View’ button to use this feature.
Pay attention to these when planning your Great Walk
- How wide or narrow the track is;
- How steep the track is (both up and downhill);
- What the track is like underfoot (gravel, sand, rocks, tree roots, mud);
- How exposed the track is (steep drop-offs, cliffs, shelter from sun/wind);
- How well-marked the track is and what kind of track markers are used.
A Note on Track Alerts
The Track Alerts section of each Great Walk page on the DOC website is designed to draw your attention to hazards or track closures which might affect your trip. It’s important to check these alerts not only at the planning stage, but also just before you head out.
The track alerts might notify you of a re-route around an obstacle (such as a slip or fallen tree), a closure of a particular section, weather hazards (e.g. avalanches, snow and ice) or even the removal of facilities such as gas from huts or bridges over large rivers (more on this below).
4 — Great Walks with Children
If you’re a family that loves the outdoors and nature, you’ll be pleased to know that it’s common for families to tramp the Great Walks with children of all ages.
There are some different considerations for families with children who want to tackle a Great Walk.
The biggest advantage for families is that any New Zealand citizen or resident up to 17 years of age can tramp the Great Walks completely free of charge (although you do still need to book a bunk for them). This is a great way to take a low-cost family holiday with your kids before they turn 18.
Tramping with your children also shows them that there’s more to the world than concrete and video games. It teaches them how to cope, adapt and be happier with less. It can also be a very close bonding experience and your children may even form lifelong friendships with others they meet along the way.
But there’s also plenty of downsides to tramping with kids, all of which you should thoroughly consider and be prepared for before heading out, including:
- Children are less resilient to weather extremes (extreme heat and cold) so to keep them comfortable book your walk for a time when weather is more settled.
- Children tire more easily, need more fuel, regular breaks and can’t carry as much as you can. Take more snacks and plan your rest stops to keep them happy.
- Little people mean little legs. Hiking with kids will probably take much longer than if you went alone. Plan your itinerary accordingly and if you don’t think they can make the full trip, consider a shorter ‘taster’ of the track instead (e.g. an overnight adventure to the first/last hut).
- If you’re embarrassed about sleeping in communal huts with children who fuss in the night (and I don’t think you should be – I’m more often woken by serial snorers!) consider taking a tent.
- When it comes to important items of gear such as packs, shoes and sleeping bags, seriously consider investing in gear which is picked for each child, rather than cheaper hand-me-downs. Ill fitting or inappropriate gear can cause pain, discomfort and irritability.
How to make a tramping trip fun for children.
- Give them their own (small) backpack filled with some necessary items like clothing and snacks (being careful not to overload them).
- Keep them occupied on boring sections by playing games as you walk or ask them to identify plants and birds.
- If you’re in an area where it’s possible, stop for a swim in lakes or streams along the way.
- Encourage them to take their own photos or perhaps even keep a journal of their daily experiences.
- Let them help you with cooking the evening meal, or preparing lunch for the following day.
- Show them good tramping and leave no trace etiquette.
5 — Staying in Huts vs. Camping
Huts are the more popular choice of accommodation on Great Walks. Aside from the obvious shelter they provide from the weather, most (although not all) include features such as:
- cooking gas
- solar lighting
- flushing toilets
- emergency radios
- water (treat first)
- wood burning fireplaces
- bunk beds with mattresses
- resident hut wardens (provide safety, weather and track information)
But huts can be very expensive, especially during the ‘Great Walks Season’ and especially for international trampers. So campsites might be a more budget-friendly alternative.
Here’s a price comparison for huts & campsites on the Great Walks for the 2022/23 season:
| TRACK | HUT FEE (NZ ADULT) | HUT FEE (INTL. ADULT) | CAMP FEE (NZ ADULT) | CAMP FEE (INTL. ADULT) |
| Lake Waikaremoana | $32 | $32 | $14 | $14 |
| Tongariro Northern Circuit | $37 | $56 | $16 | $24 |
| Whanganui Journey | $30 | $30 | $16 | $16 |
| Abel Tasman Coast Track | $42 | $56 | $16 | $24 |
| Heaphy Track | $37 | $56 | $16 | $24 |
| Paparoa Track | $45 | $45 | – | – |
| Routeburn Track | $68 | $102 | $21 | $32 |
| Milford Track | $78 | $110 | – | – |
| Kepler Track | $68 | $102 | $21 | $32 |
| Rakiura Track | $37 | $56 | $16 | $24 |
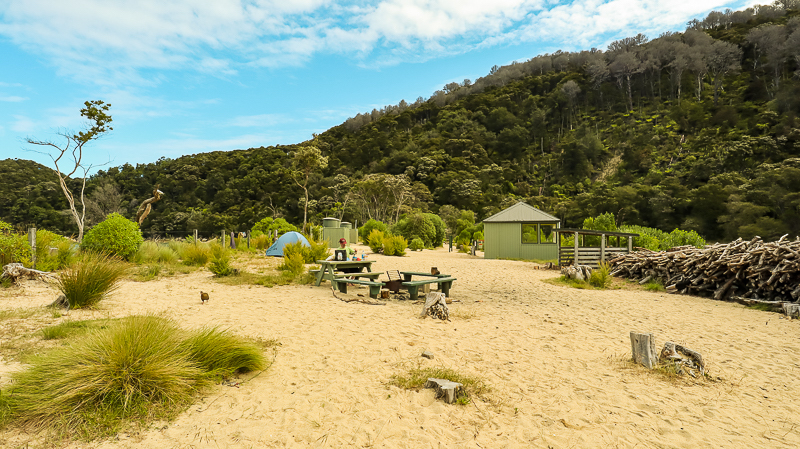
Most Great Walks (with the exception of the Milford and Paparoa Tracks) have campsites near huts or at other designated areas. Expect more facilities at Great Walk campsites than at other backcountry campsites. Most have the following facilities (although not all**):
- toilets
- sinks
- water (treat first)
- cooking/dining shelter (usually 2 or 3 sided)
- pre-flattened tent pitches
- fire pit (& maybe firewood).
** check the specific facilities for each campsite before you go.
Camping offers the opportunity for unhindered stargazing, waking to a beautiful view and being more immersed in the natural environment while you sleep.
If you decide to camp the Great Walks rather than stay in huts remember to only camp in designated areas and to book your campsites before you go using the DOC Great Walk booking system.
6 — Don’t Feel Like Walking?
New Zealand’s network of 10 Great Walks also caters to those who’d like to try their hand at a slightly different experience, with the Whanganui Journey and (relatively new) Paparoa Track.
Whanganui Journey
This Great Paddle involves a 3 to 5 night journey canoeing one of NZ’s longest and most untouched rivers in Canadian canoes or a kayak. There are guided and non-guided options, with boats available for hire from a few different local companies.
Although there are two huts en route, most paddlers opt to camp at one of the many riverside sites.
Training is provided for those unfamiliar in the hydrology of river environments or how to operate a canoe. I was very nervous before embarking on my 5 day paddle of the river during Te Araroa, but found it to be the best part of my entire journey. And despite being initially scared of them, the rapids were my favourite bit!
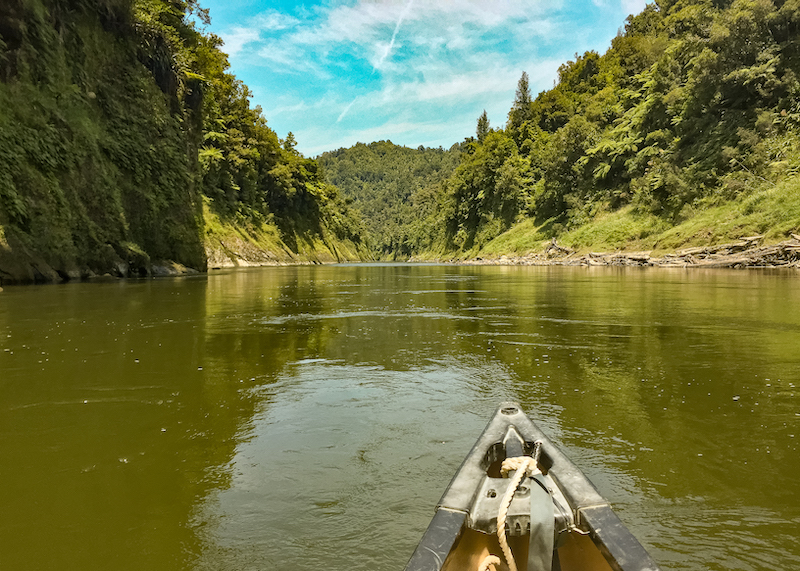
The river environment is lush and peaceful. Paddling is often optional (especially if there’s been a bit of rain) with the flow of the water carrying you along at a relaxing pace. Small waterfalls and canyons can be explored along the way, and you can hop out of your boat at Mangapurua Landing to take the 40 minute walk to the Bridge to Nowhere if you need to stretch your legs.
Paparoa Track
With the rising popularity of mountain bike tourism in New Zealand, the Paparoa Track is one of our newest Great Rides and the first shared use Great Walk track.
The Advanced, Grade 4 track is perhaps not the easiest of the shared-use multi-day tramping tracks in New Zealand (the Otago Central Rail Trail, Timber Trail and West Coast Wilderness Trails come to mind as much easier). It involves long, steep climbs, narrow tracks, poor traction and obstacles that are difficult to avoid or jump over, with the first section to Ces Clarke Hut being particularly difficult.
Although e-bikes aren’t allowed on this track, this is still a fantastic opportunity for a ‘hybrid’ experience on a multi-day track in New Zealand.
7 — Tramping the Great Walks Off Season
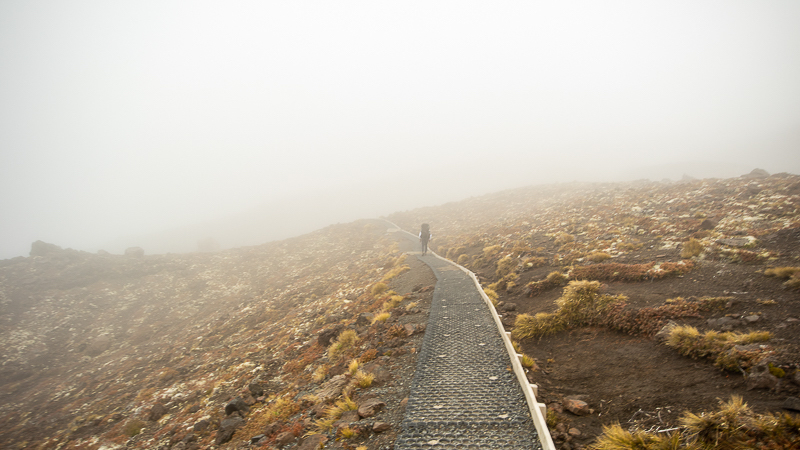
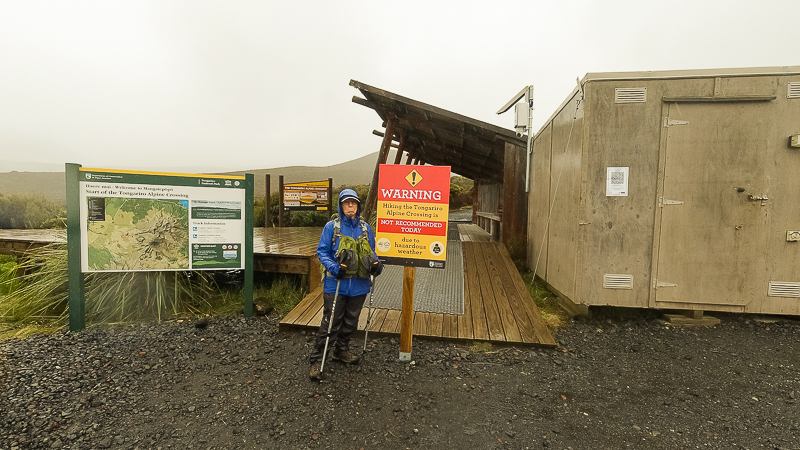
Much of this post assumes you’ll be attempting your next Great Walk in the designated Great Walks Season (1 October to 30 April). The Great Walks season brings generally more settled weather, warmer temperatures and longer daylight hours.
During the Great Walks season huts, campsites and tracks are well maintained and supplied by the Department of Conservation and permanent hut wardens are in place at most huts and campsites.
But high rainfall and bad weather can occur at either end of the season, and snow may fall at high altitudes any time. Walking tracks cannot realistically be closed during off-peak times (plus, it’s not in the kiwi tramping spirit) so be aware that the danger increases exponentially if your trip falls in the off-season (1 May to 31 September).
If you’re preparing to walk a Great Walk in the off-season make sure to consider:
Weather
Heading into late autumn, early spring and the depths of winter, weather will be harsher and less forgiving. Daylight is at a minimum and high rainfall is common causing rivers to rise rapidly (especially during Spring and Autumn). Rivers can also rise as a result of glacial and alpine snowmelt on the way into spring.
In winter, polar blasts batter New Zealand from Antarctica, and howling westerlies bring severe storms, hail and gale force winds. In alpine areas, some Great Walks may cross avalanche paths, and snow and ice may be present. Find out more about the best times to hike in NZ here.
Specialist Gear
At an absolute minimum, a very good waterproof/windproof outer layer and plenty of extra dry and warm clothing will stave off hypothermia in very cold and wet conditions. Be prepared to be fully self sufficient on the trail as facilities will be greatly reduced. Double-check you have the following:
- at least 2-3 days’ extra food supply in case you get stuck.
- stove and gas for cooking.
- full set of waterproof layers.
- extra set of warm, dry clothes.
- personal locator beacon.
- ice axe, crampons, helmet.
- avalanche equipment – beacon, shovel, avalanche probe.
Reduction of Facilities
Although huts and campsites on the Great Walks remain open and available for use throughout the year, facilities are greatly reduced outside of the Great Walks Season. Plan and prepare for the following:
- shuttles may not operate, or may have a reduced timetable.
- water supply may be turned off inside huts — collect directly from the rainwater tank or a nearby water source (either of which may be frozen).
- gas supply will be turned off to huts — carry your own stove & fuel for cooking.
- solar lighting may not work (in huts where this is available) — pack a head torch.
- wood for fireplaces may not be present (or may be wet and unable to burn).
- no hut wardens with access to radios and weather forecasts — carry a beacon and/or satellite device.
- flushing toilets are replaced with long drop or pit toilets.
- bridges which are prone to avalanches or heavy rain are removed — make sure you have the right skills and equipment and always be prepared to turn back if it’s unsafe to cross.
8 — Take a Sample
If you’re still in doubt about which Great Walk might be suitable for you, you can always sample a taster of the track before committing to anything. Many Great Walks offer easy access to the first or last huts on the route, which make a great overnight alternative if you’re still getting used to multi-day tramping. Combine two or three overnight trips in a similar region for your very own Great Walk Grand Tour.
Final Thoughts: How to Choose a Great Walk.
Learning more about what to expect and planning for all eventualities on your next Great Walk will help you (and your group) have a safe and comfortable experience on some of our most beautiful trails.
If you enjoyed this post about how to choose a Great Walk, please take a moment to help me spread the word to other trampers and hikers by sharing it on Pinterest or social media.