
Long White Gypsy uses affiliate links and is a member of the Amazon Services LLC Associates Program. If you make a purchase using one of these links, I may receive a small commission at no extra cost to you. See my Privacy Policy for more information.
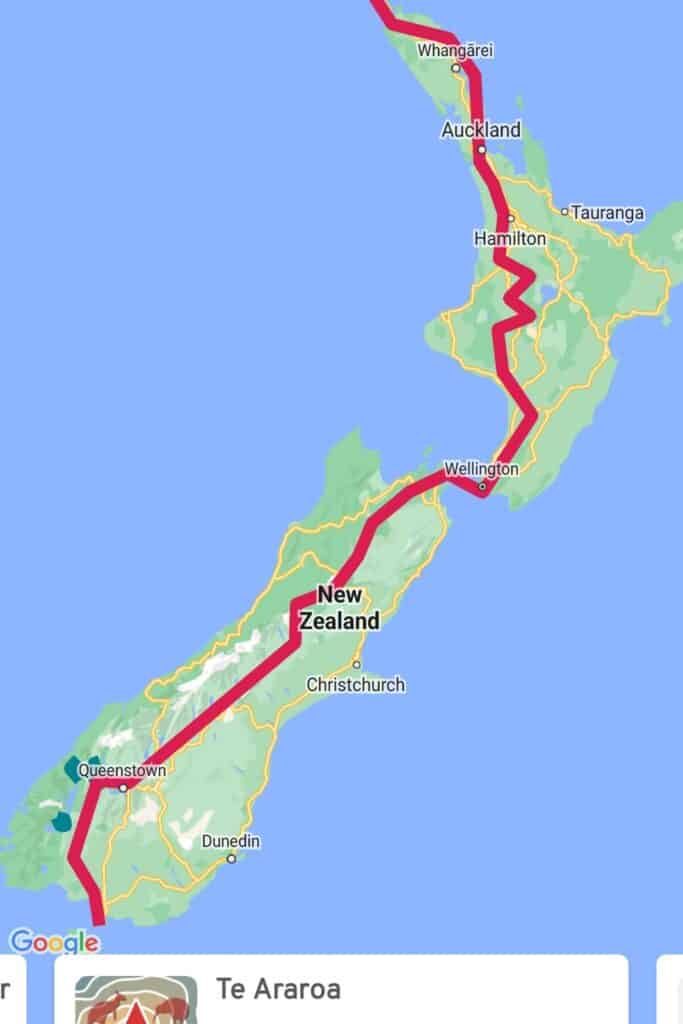
Te Araroa, a 3,000 km walking route from Cape Reinga to Bluff in New Zealand, is still a very young trail in comparison to other long distance trails in the world.
The trail route itself isn’t based on a historical walking route laid down over generations (like other long distance hiking trails in the world). Rather, it’s a hybrid network of 87 wilderness tracks connected by urban pathways, road walks, rivers and even beaches.
As a result, it can sometimes be confusing to find your way.
I walked the Te Araroa trail during the 2019/20 season, returning to the trail again in 2020/21. As a kiwi hiker I knew immediately that the way the TA route is marked is not always consistent, which often caused confusion especially for international thru hikers.
Looking back on my hike, I realise there are 4 Te Araroa navigation essentials that every aspiring thru hiker should know before they get started to ensure they can hike with confidence, avoid getting lost and never have to push that dreaded SOS button!
Let’s dive in!
1. Te Araroa Navigation: Trail Markers.
Let’s kick off with a question: What are you actually looking for when you’re out on the trail?
Each section of Te Araroa is managed by a combination of the local or regional council, local organisations and private landowners.
Unfortunately this means that each section of the TA might be marked very differently, and Te Araroa trail markings can be very inconsistent (or complete absent).
There’s also a difference between public and private sections of trail. Whereas trail markers on public land will be looked after by official organisations (such as the Department of Conservation) the trail route over private land must be marked out by private landowners.
Regardless of all that, having hiked the trail myself, I can at least give you an idea of the most common trail markers you’ll encounter when thru hiking Te Araroa, so you know what to look for.
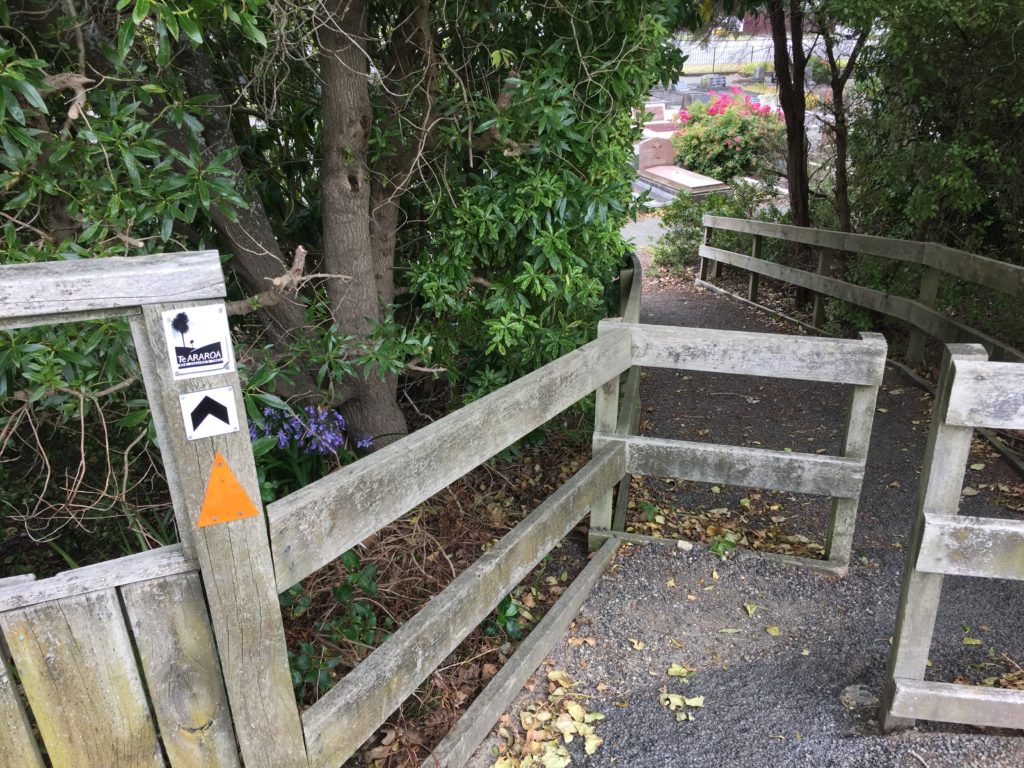
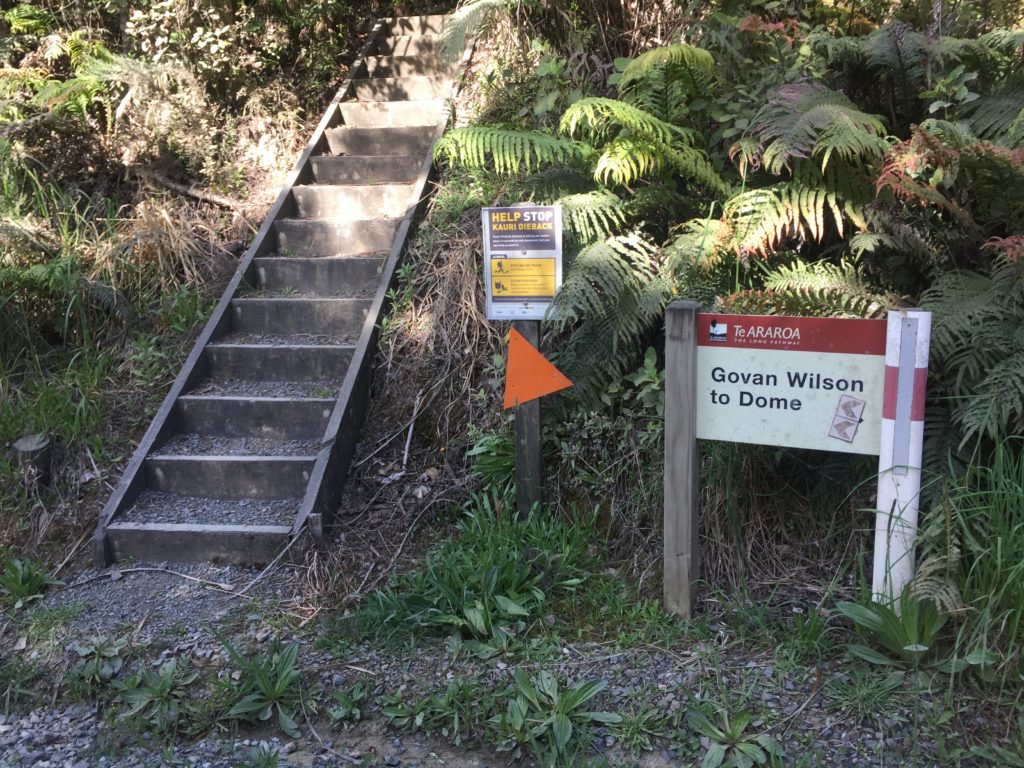
Black TA Triangles / TA Logo
Dedicated to Te Araroa only, these are usually found in residential areas, or on roads that connect urban tracks and private or Department of Conservation tracks. Usually always coupled with the Te Araroa trail logo (although this could be used on its own). Some are quite small and difficult to spot, so you’ll need to keep an eye out for them.
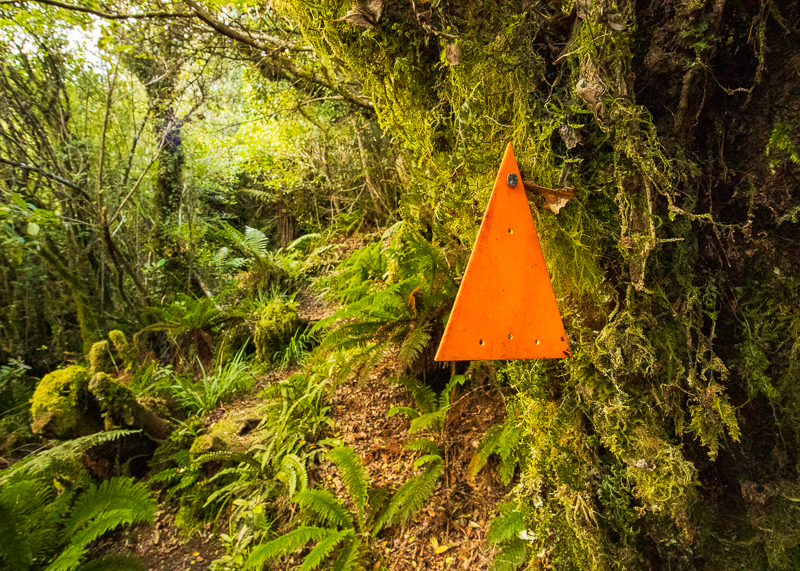
Orange Triangles
By far the most common of all the markings you’ll see, these are generally screwed onto trees, posts, or overhanging branches through bush and forest tracks (both private land and Department of Conservation tracks). They’re spaced at regular intervals so that you should be able to see the next one before moving away from the one closest to you.
⚠️ IMPORTANT NOTE
Orange triangles mark any public walking track in NZ, not just Te Araroa. If you come to a track junction, all routes will be marked by orange triangles, so you need a way to decide which one is the Te Araroa route (see below).
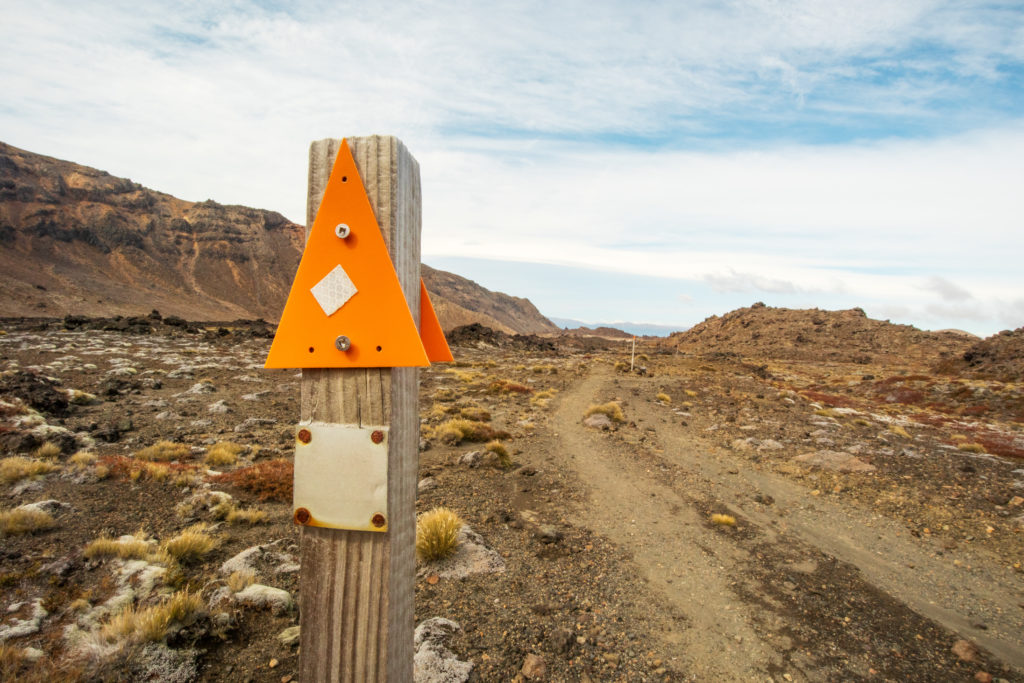
Poled Routes
Usually found above the bushline where there aren’t any trees to attach markers to. Usually comprise a long pole which is either wooden or a blue metal, with a reflective orange triangle at the top. Placed in low-visibility areas close together.
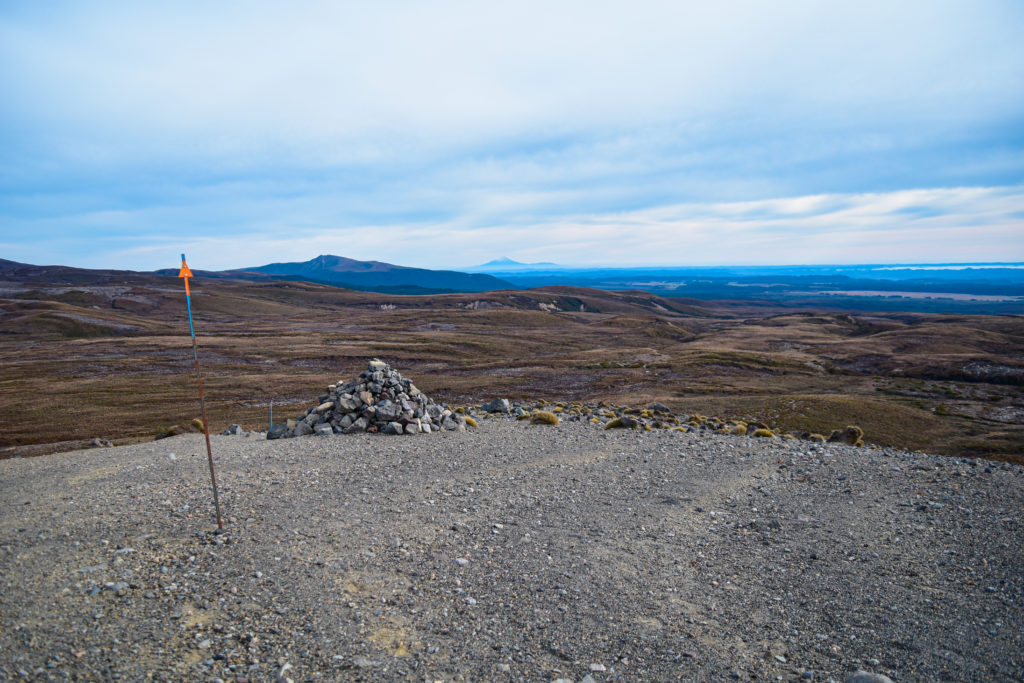
Cairns
Pretty much only found above the bushline where there are no trees to attach an orange marker to, and where poles may not be feasible due to frequent bad weather patterns. They can be large (or smaller) piles of rocks arranged in a rough pyramid formation. Reflective markers may have been wedged into the cairns to make them more visible, but this is not always the case.
Miscellaneous Markers
Although these are the most common types of trail markers on the Te Araroa route, you’re likely to come across plenty of other signage along the way.
This is why, regardless of where you are on trail — whether it’s an urban environment or deep in a forest — you must pay attention at all times. There are usually plenty of clues in the landscape to tell you where to go
Pink & Blue Triangles
On bush or forest tracks you might also see pink and blue triangles (or tapes), in addition to the standard orange triangles. Don’t follow these routes because they mark out conservation or trapping lines and lead away from the main track.
Tape or Ribbons
In some places coloured pieces of tape or ribbon (tied to trees and branches) will replace the coloured triangles (usually pink or blue, but could be any colour). It just depends what the rangers and conservation groups have on hand at the time.
But in some places sections of the TA route might be marked by pieces of tape or ribbon too! When I was hiking through the Russell Forest, a local resident had gotten so frustrated with TA hikers getting lost that she’d marked out the route with white trash bag ties!
Farm Signage
This will usually direct you to do or not do a certain thing. For example, it might ask you to keep a gate shut or open, or ask you not to pass through a paddock without first alerting the farmer.
Farms contain a lot of hazards, so always make sure to obey farm signage otherwise you could be putting yourself in unnecessary danger.
2. Te Araroa Trail Navigation: Maps & Trail Notes.
We’re talking about a true wilderness trail through some pretty unforgiving & gnarly territory, so the Te Araroa Trust has always provided a full set of paper topographical maps for hikers to use on their adventure.
But of course, in order to use them, you need to be able to navigate and locate yourself using a map & compass.
Using Paper Maps & Compass
I have to admit I break the golden rule here: I have almost no clue how to use a paper map and compass (yet).
So this is definitely a case of don’t do as I do, do as I say. If you have the opportunity, learn the old school skills of backcountry navigation. It really is the only 100% reliable means of navigation if you get lost in the wilderness.
Despite the fact I didn’t know how to use them, I did carry paper maps and a compass with me for the first few weeks on the trail. It gave me a little more peace of mind knowing I had them.

⭐⭐⭐⭐⭐
Silva Explorer 2.0 Compass✔️ Luminous dial for night use
✔️ Rubber grip for easy handling
✔️ Easy to read black & red N / S direction
✔️ Waterproof
Te Araroa Paper Maps
A full and complete set of paper maps (and notes) are available for download for free on the Te Araroa Trust’s website. The maps are updated before the start of the Te Araroa thru hiking season each year.
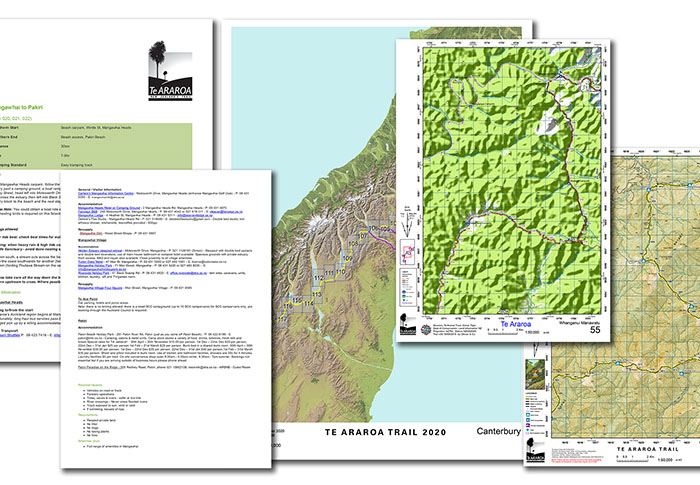
The Te Araroa Trust website has a full set of printable maps and Te Araroa Trail notes available for download. Click the picture to go to the download page.
They’re split up into sections for each region you’ll be hiking through. Most hikers will just print one section at a time so that they don’t have to carry all that paper with them at once!
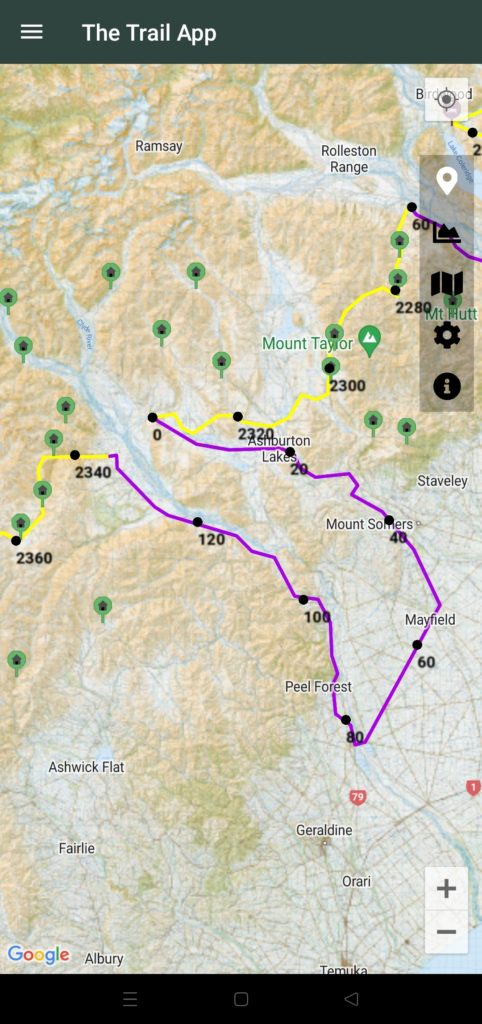
The maps are colour coded 1:50,000 topographic scale with grid and compass references, and mark out:
- the main route in yellow
- road walks in red
- bypasses (alternates) in purple
- water crossings in blue
- selected campsites, hostels & trail angels along the way
- each kilometre of the trail
I printed and used the maps (and associated notes) to plan my itinerary before I set out, and found them very useful for this purpose.
⚠️ IMPORTANT NOTE
Full Te Araroa Maps and Te Araroa Trail Notes are also available in pocket form on The Trail App which can be downloaded on both iOS and Android devices and used offline.
Do you need paper maps for Te Araroa?
If you know how to take (and follow) a bearing, locate yourself using just a map and compass and read the surrounding terrain, then you should definitely use paper maps on Te Araroa. But although this is the only truly reliable way of navigating in the backcountry, you don’t necessarily need a paper map & compass to hike Te Araroa.
If you lack the traditional skills of backcountry navigation you can still get by with the other options available… and in fact the vast majority of TA thru hikers each year do exactly that.
3. Te Araroa Trail Navigation: GPS Devices.
Because Te Araroa was my first thru hike, I really didn’t know what the best way to navigate was going to be. I didn’t know about (and hadn’t had any experience using) any of the smartphone applications for navigation, and I didn’t even know what a GPX file was, let alone how to use one!
I was really worried about getting lost. So for better or worse, I decided my best defence against getting lost was to invest in a GPS device.
Now, let me say at the outset, there are hundreds of different choices for GPS devices out there. They range from minimalist GPS apps for your phone, all the way to fully comprehensive specialist handheld devices.
How to Choose a GPS Device: My Criteria
Because I didn’t really know what I was looking for, I had to do a lot of research before selecting a GPS device.
I looked at what other thru hikers were using, and came up with this list of criteria for the right GPS for me:
- A full set of pre-loadable NZ topographic maps.
- Ability to upload waypoints / GPX route for the Te Araroa trail.
- Ability to quickly locate myself on-screen using a GPS signal.
- Ability to track my location at various intervals (and send a tracking link to my family so they could keep an eye on me).
- Ability to use a ‘backtrack’ feature in the (pretty likely) event that I got lost.
- Satellite messaging so I could keep in touch with my family.
I had to bear in mind that any GPS device would probably require some of subscription in order to use it, and that the subscription would have to be active at all times.
I also had to take into account that the GPS device would have a battery that needed to be topped up. Ideally I’d look for a device with a long battery life to start with.
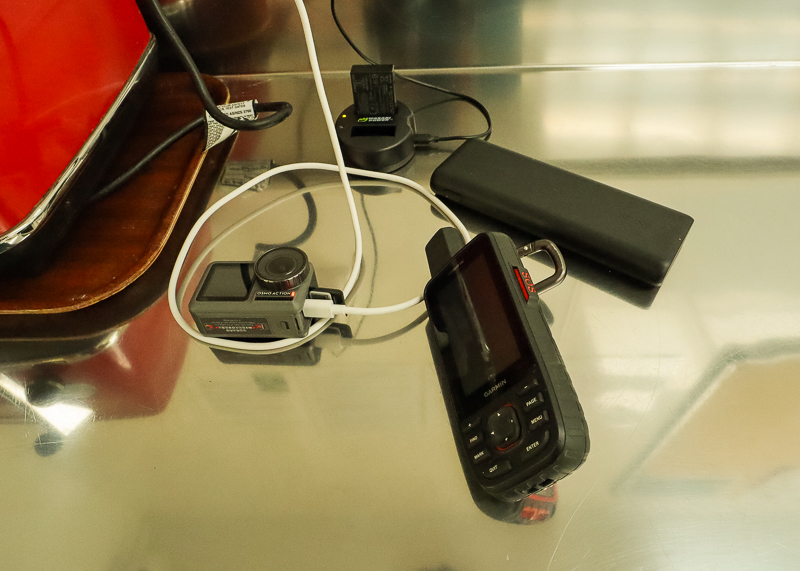
My Chosen GPS: Garmin GPS Map 66i
Pretty quickly, the Garmin GPS Map 66i emerged as a clear winner.
Firstly, I’d already seen plenty of other thru hikers using the previous generation Garmin inReach on other long distance trails. I like the idea that these devices not only had the ability to track your route, but that they also came with messaging features and an SOS button.
At the time, the traditional inReach devices were going out of production, to be replaced by the inReach mini and the GPS Map 66i.

⭐⭐⭐⭐⭐
Garmin GPS Map 66i✔️ GPS breadcrumb tracking & link sharing.
✔️ Supports GPX route & waypoint uploads.
✔️ Satellite messaging & weather forecasts.
✔️ Backtracking.
Because I’d decided I wanted a device that could also be used for route-finding and navigation, the GPS Map 66i won out for me.
Although I liked the small size of the mini, in order to use the navigation features you have to download the Garmin app and tether it to your phone. There was something about having to rely on my phone battery alone which I just didn’t like — especially as it was an older phone.
Although it required a set-up fee (NZD60) and a monthly subscription (NZD40) to use all the tracking and messaging features, I factored this in as a cost of doing the hike and overall was very happy with its performance.
In hindsight, it was totally overkill. The satellite messaging feature was almost redundant — there were very few places on my hike of the North Island where I didn’t have cellphone reception — and I rarely used the navigation features once I downloaded the FarOut / Guthook app.
However, I turned on my tracking every single day when I started walking. And it was totally worth the investment when I dropped my phone in the Whanganui River and had no other means of communication!
I’ve used the Garmin GPS Map 66i on every single overnight or multi-day trip I’ve done since, and now that I’m more familiar with how to use it, it’s become a must-have part of my kit.
TrackMe NZ GPS Hire
When I returned to the TA in 2020 to re-attempt the South Island leg, a new company had started up in the GPS navigation space — TrackMe NZ.
TrackMe NZ is based in Christchurch, NZ and offers a GPS hire solution for Te Araroa thru hikers who can’t afford to outlay a substantial chunk of cash on a new device.
They have two options for Te Araroa navigation for thru hikers:
- Hire a Garmin inReach Explorer Plus from them for a set monthly fee whilst you are hiking Te Araroa – cost NZD 150 per month of hire.
- Connect your own Garmin inReach device to their tracking network for a set monthly fee whilst you are hiking Te Araroa – cost NZD 49 per month.
Their subscriptions come complete with everything you need to use the device on trail, plus the cost of the device hire and 24/7 support from the TrackMe team.
I can vouch for TrackMe’s excellent service secondhand. My South Island hiking companions had to activate their SOS beacon a couple of days after I left them in the Richmond Ranges section. They were really impressed with the level of service provided by the TrackMe team in facilitating their rescue in inclement weather, the clear communication with them and their emergency contacts, and their attention to detail.
Read more about how TrackMe has helped Te Araroa hikers in this article, or find out more / submit a hire application.
Disclaimer on Electronic Navigation Devices
Regardless of whether you’re buying your own GPS device, hiring one or using a minimalist GPS app on your phone, if you’re going to rely on it for Te Araroa navigation you need to make sure you’ve got plenty of battery life.
The last thing you want is to realise you’re lost, pull out your phone or device to find your way back to the trail, and realise you’re out of battery!
🔥 HOT TIP 🔥
Use low power modes on your electronic devices while you’re hiking. My Garmin has ‘Expedition’ Mode to conserve battery and I always put my phone on Airplane / low power mode while I’m hiking. This means I can still use the navigational features (offline) but my phone isn’t using up battery by constantly checking for messages and signal.
On a thru hike like Te Araroa, it’s a really good idea to carry some extra juice in an external battery bank or power supply.
A power bank that can hold 10,000 maH (milliamp hours) of battery charge will suit most people, as that can fully charge a standard smartphone 2 to 3 times.
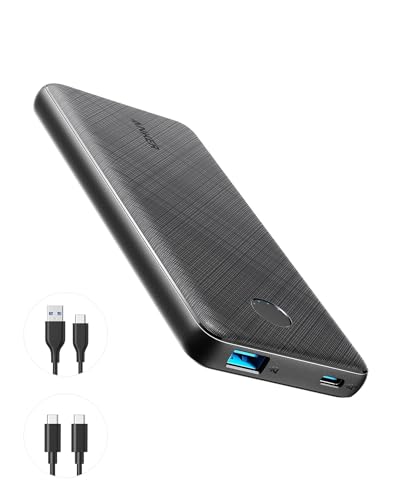
⭐⭐⭐⭐⭐
Anker Powercore Slim 10k Power Bank✔️ Lightweight 250g slim design.
✔️ Holds 2.25x iPhone 12 charges.
✔️ Power delivery for fast recharge in 4.5 hours.
Do the calculations before you commit to buying a battery bank. Think about:
- how many devices you have which need to be charged
- how big they are (capacity)
- how often you’ll need to charge them.
When I was hiking Te Araroa I had a phone with a 4,000 maH battery and a GPS with a 3,100 maH battery. I knew I wanted to have at least 2 charges of each at any one time, plus a bit extra, so I bought a 20,000 maH battery bank.
( 4,000 x 2 ) + ( 3,100 x 2 ) = 14,200 maH
4. Te Araroa Navigation Apps.
Regardless of whether you’re using paper maps or not, I’d highly recommend using one of two navigational apps on your smartphone: The Trail App or FarOut (Guthook) guides.
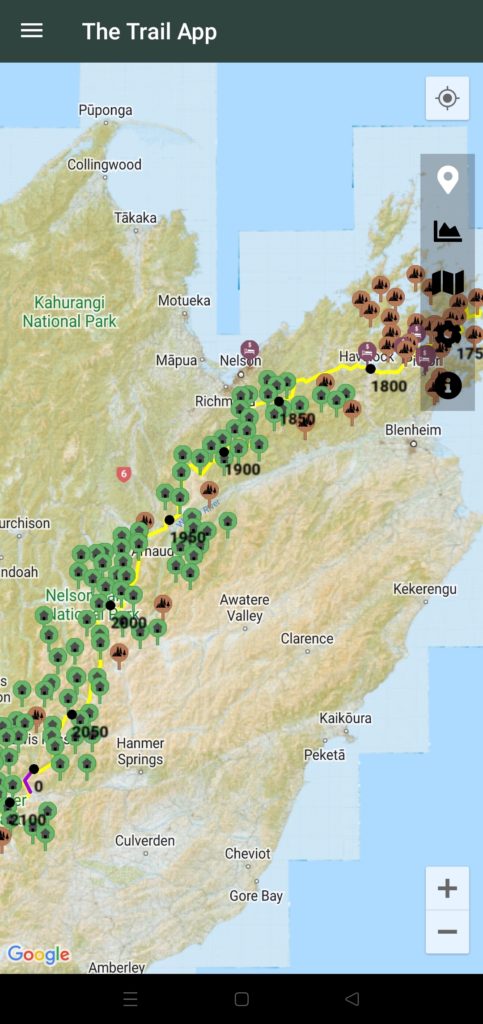
The Trail App (Official Te Araroa App)
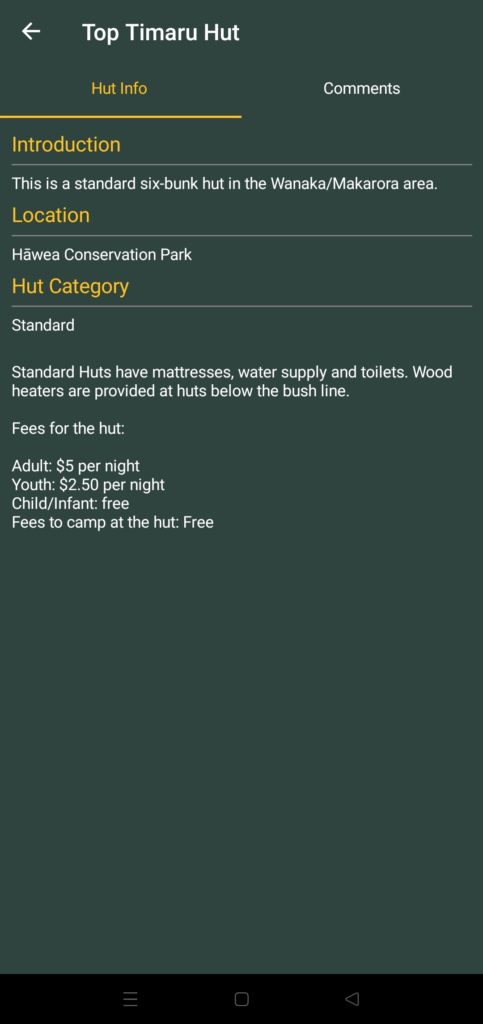
The Te Araroa Trail app has been developed by the Te Araroa Trust as an official (and FREE) source of maps and information for section and thru hikers of Te Araroa.
The app contains the full set of downloadable offline topographical 1:50 maps (requires a stable wifi connection to download) which covers the official trail route for the upcoming season including locations of all huts, campsites, potential water sources and kilometre marker points along the way.
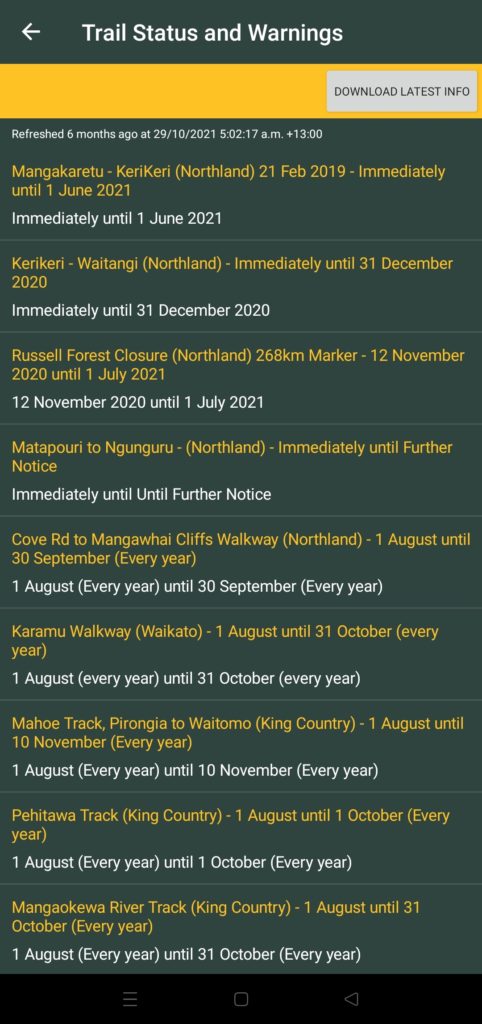
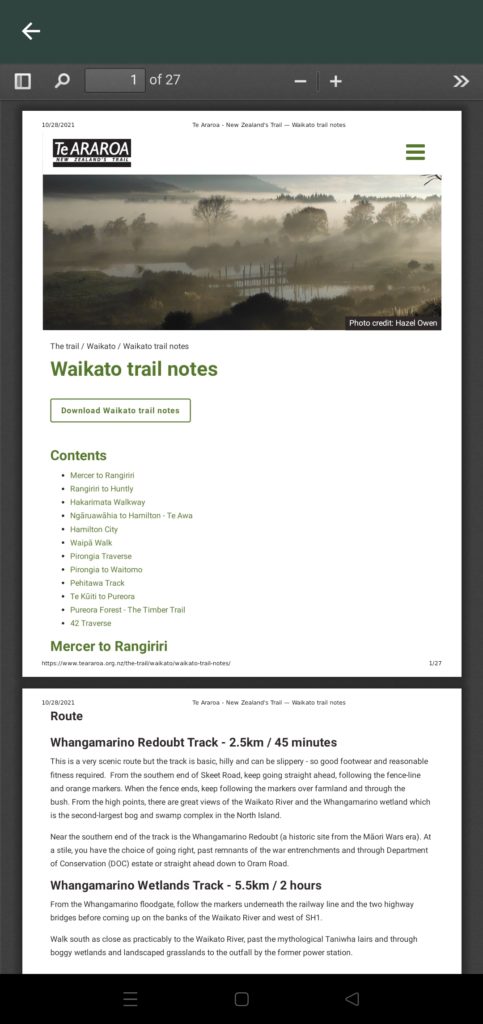
It also includes the full set of Te Araroa Trail Notes for the current season, and is packed full of other handy features such as elevation profiles, track warnings, GPS/satellite tracking and user comments.

FarOut (Guthook Guides)
The Trail App is the preference of many TA thru hikers, because it’s FREE and contains official information. You could probably get by with just using that app on its own.
But in my experience, it’s always a good idea to have a backup (in fact, the Trail App was a bit glitchy on iPhone when I was hiking the trail so I needed a backup).
The second choice of many TA thru hikers is FarOut Guides (previously known as Guthook). I first came across FarOut when I was looking into hiking the Pacific Crest Trail.
As with the Te Araroa Trail App, FarOut Guides features:
- Downloadable offline topographical maps
- GPS/satellite locating and tracking (including a handy directional arrow to see which way you are facing)
- Hiker comments & photos, so you can research the upcoming section before you leave down
⭐⭐⭐⭐⭐
FarOut Guides – Te Araroa Trail Maps✔️ Downloadable offline maps.
✔️ GPS tracking for instant location.
✔️ Comments & photos from trail users.
The hiker comments are really useful when planning how much food/water you need for an upcoming section. Hikers will leave comments like:
- how full the hut has been (i.e. whether you’re likely to get a bunk)
- how much water the hut/campsite has (so you know how much to carry)
- whether the trail is washed out or if a tree is down (so you can decide if you need to take an alternate)
- and much more…
When I was hiking the TA, there were no user comments on the Trail App. But FarOut Guides‘ app did have this feature. Now though, the Trail App does have user comments, meaning you no longer need two apps to get all the benefits.
Two other features of FarOut Guides that I really enjoyed were:
- Elevation profiles – More user friendly than The Trail App’s version as they also show the location of waypoints (like huts and water sources) along the profile; and
- Distance calculation – Not only can you find the exact kilometre marker you’re on (to one decimal place) but the app also calculates the exact distance to your next waypoint for better planning.
If you just want to try it out to see what it’s like, you can download a free trial of the Auckland area maps on FarOut Guides.
When you’re ready to buy, you can purchase the full set of Te Araroa maps in one go, or section by section (i.e. if you’re only hiking part of the trail). And once you buy, you have access for life (even if you switch devices)!
>> Buy the FarOut Guides Te Araroa Trail Maps Here <<
Other Useful Navigation Apps
I’ve had a bit of experience using other navigational apps on Te Araroa, and also in my general hiking adventures. Here are some of the other apps you might consider for your thru hike:
NZ Topo 50 North & South Island apps
The NZ Topo 50 maps are my go-to navigational apps for hiking anywhere in New Zealand. There are two apps, a North and South Island version, which allow you to have official topographical maps in your pocket.
When you purchase, you get access to the full set of pre-installed offline 1:50,000 topographical maps, including a GPS positioning feature to locate yourself as you walk.
There are heaps of features to explore, but specifically for Te Araroa walkers:
- there’s a Te Araroa track overlay (although this may not always show the most recently updated route); or
- (for more accuracy) you can import the official Te Araroa maps GPX file straight into the app for your trip.
The best thing about these apps is that there’s no hidden fees. You just get the full suite of maps when you sign up for the one-off price.
The biggest downside is each app requires you to have 2GB of free storage space on your phone, so they take up a little bit of real estate.
NZ Topo 50 N
Get it on Google Play | Apple
NZ Topo 50 S
Get it on Google Play | Apple
iHikeGPS NZ
I first discovered iHike GPS when I owned an iPhone. I was looking for a way to get GPS tracking and topo maps in my pocket and someone had recommended it to me.
Shortly after I discovered it I switched to an Android phone, so my use of this app is limited but it comes highly recommended by many NZ trampers.
Features include adding waypoints, routes and tracks. You can import GPX files (making it useful for Te Araroa walkers), check the distance between two points, and see a trip timer and odometer directly from the map screen.
The biggest thing I love about this app is that you can turn on tracking when you start walking, and come away with a full route map from your hike.

iHike GPS
Get it only on Apple
Maps.me
My Te Araroa hiking companion, Julia, used Maps.me as her main source of navigation when she started Te Araroa, so I got quite familiar with it as well.
The FREE version comes with 10 base maps of your choice, but for hiking you’ll need to buy a monthly subscription to get access to hiking maps. The maps are offline, with turn by turn navigation, including elevation profiles and GPS tracking.
One of the best things I like for Te Araroa hikers is that you can use it to easily find accommodation, shops, supermarkets and other things when you get to town. But it’s not really a dedicated hiking navigational aid.

Maps.me
Get it on Google | Apple
MapOut
MapOut is another downloadable offline topographic maps system for your iPhone.
You can download maps region by region, so for Te Araroa you would download all the NZ maps, and then overlay a GPX file.
What makes MapOut great for Te Araroa walkers is the easy-to-read 3D representation of the terrain, which really helps visualise the track much more than a traditional elevation profile does.

MapOut
Get it only on Apple
Plan my Walk
Developed by Mountain Safety Council New Zealand, this is an easy way to plan and prepare for any hiking trip in New Zealand. It’s completely free, but you will need to create an account to use it.
There’s no specific map for the Te Araroa trail as a whole, but all the individual tracks which make up Te Araroa can be searched on this app.
When you select a track and enter your trip dates you can receive track alerts, weather warnings / watches, and a track-specific weather forecast, which is a great resource especially for the South Island tracks.

Plan My Walk
Get it on Google | Apple
Hiiker
Featuring all of the other conveniences offered by many of these hiking apps, like the ability to import GPX files (like the Te Araroa maps) and unlimited downloads of all your favourite offline topographic maps, the Hiiker app also includes accommodation & services overlays making it easy to find restaurants, shops & supermarkets on your trip.
The app also records your hiking activity, and there’s a paid subscription version for extra features and benefits.

Hiiker
Get it on Google | Apple
Map Toaster
This app developed by Christchurch-based company Integrated Mapping Ltd has 1:250,000 topographic maps included for free, but 1:50,000 topo maps must be purchased via subscription.
The maps are stored directly on your device for offline use and you can import your own GPX route which is helpful for TA hikers. It’s super easy to search for tracks, huts, campsites & other landmarks, plus you can search by coordinates, navigate to, import and share waypoints, and create your own tracks by tapping them out on-screen.

MapToaster NZ Topo Maps
Get it only on Apple
BackCountry Navigator Pro
One of the few navigational apps for hiking which are available only for Android, BackCountry Navigator Pro integrates with Android wear so you can sync your route and get turn-by-turn directions straight to your wrist.
Featuring that all-important ability to import waypoints from GPX files, or add your own, the base version of the app is a pocket GPS which includes full topographic maps for New Zealand for a one-off fee.

BackCountry Navigator Pro
Get it on Google | Apple
Sandfly Map
What may at first seem like a bit of fun, does in fact become a very valuable tool when hiking in New Zealand. The Sandfly Map app collects user data & reports to pinpoint sandfly hotspots in New Zealand, so you can plan & prepare for the worst!
Colour coded for ease of reference, this is a helpful tool to prepare for your day ahead before you even leave your campsite.

Sandfly Map
Get it on Google | Apple
Te Araroa Navigation: FAQs
What’s the best way to navigate on Te Araroa?
The preferred method of navigating on Te Araroa is with the Te Araroa Trust’s paper maps and a compass. But unless you’re already skilled at map reading, these items will probably be useless to you. Much of Te Araroa is well-marked (check this video on Te Araroa navigation & trail markers for more info) but I’d highly recommend you download either (or both) The Trail App and FarOut Guides‘ (aka Guthook) Te Araroa Maps.
If you have a GPS device or app, you can download the Te Araroa map GPX files from the Trust website (use the link for paper maps above) and load them into your device. Always carry plenty of backup battery power if you’re using an electronic device for navigation.
Where can I find the Te Araroa trail map?
The current year’s trail maps and trail notes can be downloaded directly from the Te Araroa Trust’s website, or can be downloaded for use online & offline on The Trail App [ App Store | Google Play Store ].
Final Thoughts: Te Araroa Navigation
When planning to embark on a long distance hike like the Te Araroa Trail, there’s a certain amount of preparation involved. Part of that preparation is making sure you know where you’re going, and planning for what to do if you get lost.
This post has been written by me, a past Te Araroa thru hiker, to help you make the right decisions when it comes to your chosen Te Araroa navigation plan.
From showing you what trail markers you’re likely to encounter out there, to helping you decide what maps and devices to carry with you on your adventure, I hope you’ve taken my suggestions and experiences on board and now feel confident you can take your first steps on the trail without getting lost.