Long White Gypsy uses affiliate links and is a member of the Amazon Services LLC Associates Program. If you make a purchase using one of these links, I may receive a small commission at no extra cost to you. See my Privacy Policy for more information.
Worried about getting lost on the trail or how to protect yourself if you’re going on a solo hike? Perhaps you’ve been asking yourself what not to do during hiking trips, or how to increase your hiking awareness and hiking safety when you’re on the trail?
If that sounds like you, then this post is for you! I’ve got all the hiking safety tips you need to get out and explore the trails with confidence and ease!
But why should you listen to me? Well, I’ve been hiking in New Zealand’s challenging environment for over 5 years. Over that time I’ve experienced being lost, cold, tired, hungry and exhausted. I’ve researched and planned the safety aspects of hiking trips on over 40 different tracks, 4 Great Walks and over 2.5 months of continuous hiking on NZ’s long distance trail, Te Araroa. I know what to do before during and after hiking trips to stay safe and get home.
Although this post is specifically tailored to hiking in New Zealand (or tramping, as we call it here) there are heaps of safe hiking tips here to help anybody hike smart on the trails. So let’s jump into it!
10 hiking Safety Rules for Hiking or Tramping in NZ.
HINT: The first 5 hiking safety rules below form the New Zealand Land Safety Code, which helps keep everyone safe in the outdoors as well as acting as some great hiking safety tips for beginners too!
1 — Choose the Right Trip for You / Your Group
The first and most important aspect of any article about hiking safely, is making sure you know how to assess whether you’re likely to have difficulty on track before you even set out.
This starts with an assessment of whether your planned adventure is the right kind of adventure for you and/or your group.
Know Your Limits
One of the most common ways people get into trouble in the wilderness is by failing to properly acknowledge or understand what their capabilities are. Some of the things people frequently underestimate on tramping trips are:
- their fitness – strenuous or lengthy hikes which elevate the heart rate or stress the lungs can lead to medical events which require emergency services.
- their strength – a lack of muscular strength can put extra strain on other parts of their body, leading to injury or fatigue which causes a stumble or fall.
- their mental limits – extended periods of discomfort, cold or heat can cause mood to fluctuate dramatically, leading to a lack of morale and bad decision making.
You can easily assess what your needs and capabilities are by gradually building up your hiking experience and getting to know how you, your body and your mind react to different stressors on the trail.
Pay particular attention to how you react and respond to food & water, hot and cold temperature fluctuations, uphill and downhill trails, wind and rain, longer and shorter trips.
Know the People in Your Group
If you’re hiking in a group (or planning to) then this hiker safety assessment also extends to knowing the other people in the group and what their capabilities and limits are.
Consider and discuss the following questions with your group members:
- What is the hiking experience of the other members of your group?
- What is the age of the other members of your group?
- Do any members of your group have special medical or other needs?
- How long can the other members of your group comfortably walk for (with and without a pack)?
- Does everyone in your group have the required gear and equipment?
- Are any special skills required for the particular track you are attempting, and do any members of your group lack those skills?
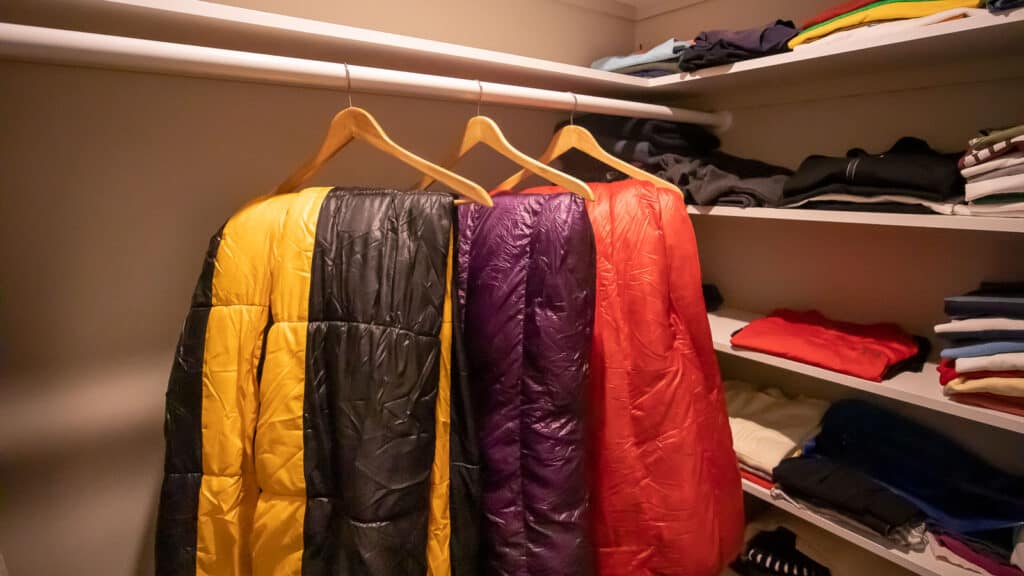
WANT A SLEEPING BAG THAT LASTS THE DISTANCE?
Discover my tips for how to store a sleeping bag like a pro.
Know Your Location / Terrain
Before tackling anything too epic or adventurous, make sure you have built up some familiarity with the location and terrain you’re likely to experience. Avoid tackling difficult or dangerous conditions on tracks or trails and in regions you’ve never hiked before.
Familiarity breeds confidence, but it also breeds knowledge and good decision making. The more you know an area, the better you’ll be able to make decisions, especially if you’re compromised.
For example, if you lose the trail in a freak storm, you’ll be much better equipped to find your way to safety if you’re able to recognise some of your surroundings (even if only very generally).
Start Small (& Assess Your Progression)
One of my top safety rules for hiking is: If I don’t know an area or location, I start small and easy before progressing upwards.
Smaller and easier tracks are more forgiving if things go wrong, because they’re usually closer to things like roads & towns, and busier so there’s more chance of getting help if you need it.
Most regions (including National Parks) in New Zealand have a handful of shorter and ‘easier’ walks suitable for tourists and leisure walkers which you can use to familiarise yourself with the area before venturing a bit more off the beaten path.
2 — Understand the Weather
Knowing and understanding New Zealand’s weather patterns from region to region is an important aspect of any hiking safety kit. Each region of the country experiences quite different weather patterns and extremes. It pays to get to know them as you hike your way around.
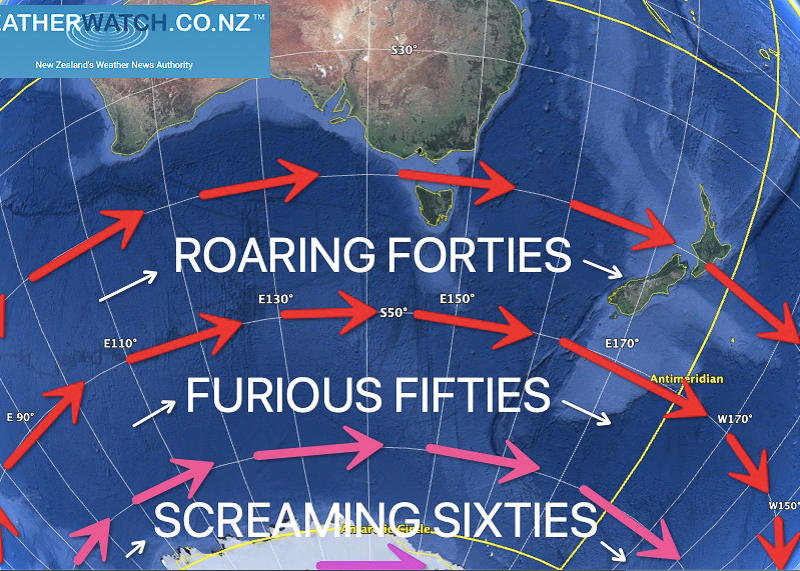
WHY IS NZ WEATHER SO CHANGEABLE?
For example, no experienced kiwi tramper ventures into the Tararua Ranges without first checking the wind speed and rainfall forecast as these are the two most important factors in the ranges.
Weather is so changeable here that I’ll admit, I usually don’t pay much attention to the forecast until two to three days before my trip. But I keep my eye on countrywide forecasts, and do an important final check on the day (even getting the official forecast from the local DOC Visitor Centre when I arrive) before I set foot on the track.
‘Bad weather’ includes the strong NZ sunshine
‘Bad weather’ doesn’t always have to be heavy rain, strong winds or snow. The New Zealand sun also carries a unique set of dangers and hazards.
Sunstroke and heatstroke are very real threats in NZ, especially if you’re hiking through exposed terrain. Prolonged exposure to the sun without any respite can cause dehydration, severe sunburn and hyperthermia (heatstroke).
Make sure you’re packing plenty of sun protection with you, including:
- high SPF sunscreen (50+)
- long clothing layers (top and bottom) to cover up with
- sun hat (wide brimmed or with neck protection)
- sunglasses (polarizing is helpful)
- more water than you need
3 — Pack Warm Clothes & Extra Food
I can’t stress enough how much you really should be packing warm clothes (think long layers, insulated jackets, beanies and gloves) on every hike you do… yes, even in the middle of summer and yes, even if you’re only hiking for a couple of hours.
And it’s the same situation with food (snacks, chocolate, high caloric and high morale foods) and don’t forget to drink water… Always bring more than you think you’ll need!
Contrary to popular belief, this isn’t because we more experienced hikers take pleasure out of watching you torture yourself with all that extra weight and bulk in your pack.
It’s actually so you don’t succumb to the pressure to look ‘cool’ by only carrying your water bottle and phone, and end up hypothermic when you twist your ankle on the way back from that waterfall.
Remember the golden rule of the outdoors: Be prepared. Anything can happen while you’re out there.
Pack the Right Gear
While we’re on the subject of being prepared, let’s talk about making sure you have all the right gear.
It’s no good going for a hike in Fiordland with a flimsy, water resistant jacket from the Warehouse. It’s also not much use going for a hike along a beach in Abel Tasman in your sturdy tramping boots.
Be aware of what the conditions are likely to require, and pack for them. Understand that New Zealand is a changeable environment, with a diverse range of terrain and conditions which often require tweaks to your gear.
We’ll discuss the most important items of gear you need to pack a bit further on, but know that when I mention things like ‘rain gear’ or a ‘rain jacket’ this could be anything from a plastic poncho to a mid-thigh length triple layer fully waterproof outer shell.
4 — Share Your Plans and Take Ways to Get Help
Have a Plan and Share it with Someone
Another important part of planning for an emergency and staying safe on trail is to tell a trusted person your plans before you go.
This can be done by leaving them a detailed note, sending them an electronic message which they can refer back to, or sharing your online trip details (through a site or app like Plan My Walk) with them.
Information to Share with Your Emergency Contact
- Where you’re going (general park or region)
- Which track you’re walking (or your planned route if a multi-day trip)
- Where you’ll be staying (per night if a multi-day trip)
- Anticipated time (and day) you’ll be starting
- Anticipated time (and day) you’ll be finishing (arrival time back to trailhead and then ETA back home)
- If you have a plan for emergencies or if you get stuck in a hut (be as detailed as possible)
- If you think you’ll have to take an alternate route at any point (which route, where to, anticipated change to your finishing date/time)
And do you know what the most important part of having a plan is? Sticking to it!
Stick to your plan, and don’t make any last minute changes unless absolutely necessary for safety or survival!
If something happens to you, the first thing emergency services will do is get in touch with your next of kin / emergency contact. The more information that person has and the more accurate it is (because you’ve stuck to the plan), the more likely you’ll be found and rescued sooner.
Plan for Emergencies (& have a Plan B)
As prepared as you might be, by packing the 10 essentials and checking the conditions before you go, things can still (and do still) go wrong.
I never head out on a tramping trip without considering what emergencies might occur whilst I’m out there. And this depends on if I’m hiking alone or in a group.
If you’re hiking alone, ask yourself:
- what happens if you have a slip or fall and can’t get yourself to shelter? you’ll want to make sure you have an emergency shelter in this scenario.
- what happens if you come up against a swollen river you can’t cross? again, you’ll need an emergency shelter or a plan to turn around and return to safety.
- what happens if the weather takes an unexpected turn, and you can’t reach (or can’t leave) your intended place of shelter?
- what happens if you get lost? you’ll need a plan for how to find your way back to your last known location, or signal help if you can’t do so.
- what happens if you get hypothermia? you’ll need a plan for how to re-warm yourself and signal for help.
If you’re hiking in a group, the dangers are spread out over more people, which makes them more manageable, but you should still ask the same questions, especially:
- what if only one or two people in the group are carrying the first aid supplies? my preference is for every member of the group to have a basic first aid kit.
- what if only one person in the group is carrying the PLB? plan to take regular breaks so slower members can catch up, then make a plan for what happens if someone doesn’t turn up.
And always have a Plan B option. This could be as detailed as taking a less risky alternative route to the same destination, or as simple as turning around and trying again another day in better conditions (more on this below).
Take A Communication Device
It’s common to find that cellphone coverage is limited (or non-existent) on wilderness trails, whether in NZ or throughout the world. Don’t rely on a cell phone for communication in the wilderness.
It’s your responsibility (and one you should take very seriously) to make sure you have a reliable means of communication, regardless of how long you plan to be out for. This is so:
- you’re found quicker, if you get lost or injured; and
- rescue teams are at less risk whilst they look for you, as they’ll have a good idea of where you are.
Let’s cover off some common backcountry communication devices you might consider.
Cellphone
A cellphone can be a valuable communication tool with the right preparation, but it can also be dangerous if relied on too heavily, because
- It requires cellphone coverage or service in order to use.
- It has a battery which requires charging and can deplete quickly, especially in cold or freezing conditions.
- It’s very fragile and can easily break if dropped, stood on etc.
Please don’t rely on your cellphone as your primary means of emergency communication.
If you absolutely have no choice but to use your cellphone as your main method of emergency communication, then at least make sure to:
- Check before you set out if there’s cellphone coverage on your planned trail (or where you’re likely to lose it).
- Turn your phone onto Airplane mode (or even better, turn it off) as soon as you start hiking to preserve battery.
- Carry with you in your pack an extra battery supply and charging cable for your cellphone.
- Reserve the extra battery for emergencies only, and move it (and your phone) to a warm place next to your body if the temperatures drop to preserve its life.
Personal Locator Beacon
Considered the gold standard of search and rescue, Personal Locator Beacons are the chosen and preferred method of emergency communication in the wilderness (and especially in New Zealand) for the following reasons:
A PLB is an emergency device which allows you to signal emergency services if you require immediate help. It uses GPS and satellite positioning to send a signal to a centralised search and rescue command centre which then dispatches a team to your location.
This makes them an important and non-negotiable piece of hiking safety equipment.
Benefits of Personal Locator Beacons
- Built-In Long Lasting Battery — Battery lasts 24+ hours once triggered and 5 or more years (depending on model) from date it’s manufactured or placed into service.
- Never Needs to be Charged — See above. Although servicing and replacement of the battery may be required from time to time, you don’t need to charge the device in order to use it.
- No Monthly Subscription Required — You don’t need a monthly or annual paid subscription in order to use the SOS function.
- Very Accurate — Once triggered the device continues to send regular GPS pings which can be accurate down to 3-5 metres.
- Works Anywhere in the World — Although you’ll register it in your home country, you can trigger the device from anywhere in the world.
Although they can be a significant financial investment to buy outright, many people don’t know PLBs can also be hired for as little as NZD $10 – $20 per day. DOC Visitor Centres, iSites, and outdoor retailers like Macpac and Bivouac hire PLBs, as well as online companies like Locator Beacons NZ.
⚠️ IMPORTANT NOTE
A PLB battery needs to be serviced/replaced at the manufacturer’s recommended intervals (i.e. 5 to 7 years) and must also be replaced after any instance where SOS has been triggered.
Satellite Messenger Device
A favourite of trampers and hikers who spend multiple days (or even months) going hiking on long expeditions, satellite messenger devices provide a two-way communication system so you can keep in touch with friends and family on your travels.
Benefits of Satellite Messenger Devices
- Two-Way Communication — Send messages and emails to and from your trusted contacts to keep in touch on your travels.
- GPS Tracking — Many models have a ‘tracking’ feature which allows your contacts to see your location in real time when switched on. Uses satellite and GPS positioning.
- Navigational & Weather Functions — Depending on the make/model it may be possible to load navigational tools like topographic maps & GPX routes, or download weather forecasts. Helpful if out of cell phone range.
- SOS / Emergency Function — Many satellite messengers will also include a built-in SOS function, but beware that you’ll probably need an active subscription to use it!
The two biggest downsides of satellite messenger devices are:
- The SOS function will only work as long as your satellite messenger has battery power — meaning you have to have enough juice to trigger it and keep the SOS signal sending whilst rescue teams find you; and
- The SOS function will only work if you have an active paid subscription.
The above factors mean that satellite messenger devices are much less reliable than PLBs.
Mountain Radio
There is a service in New Zealand called the mountain radio service, which is an ultra-high frequency radio communications line.
I’ve never used mountain radio myself, but I understand that users can be supplied with a radio device and aerial, which enables you to check in with daily broadcasts at scheduled times. You can also use the radio to send an emergency communication.
Unlike PLBs and Satellite Messengers, they don’t require ‘line of sight’ to satellites in order to communicate, and are not blocked by terrain like mountains. However they can be cumbersome to set up. Find out more here.
SOS: How to Signal for Help in the Backcountry
- If you have cellphone reception dial 111 and ask for the police.
- If you have no cellphone reception, and are carrying a satellite messenger device, contact your emergency person and ask them to raise the alarm (call the police).
- If you have no cellphone reception, and are carrying a PLB or satellite messenger device with an SOS button, activate the SOS function.
- If you have a mountain radio, tune into the correct frequency and begin sending clear and concise requests for rescue/help.
- If you’re at or near a hut, notify the hut warden (if present) or use the hut radio to call for help (Note: not all huts have radios).
- If you have a satellite phone, call one of the following numbers:
- North Comms (covers New Zealand north of Turangi): 09 571 2800
- Central Comms (covers North Island south of Turangi): 04 381 2000 (ask for Comms)
- South Comms (whole of the South Island): 03 363 7400 (ask for Comms)
- If you have no communications and you’re in a party of 4 or more people, consider sending at least two of your party for help. (Note, this is a risky option).
- If you have no communications and are on your own, your only option is to stay put and make it as easy as possible for rescue teams to find you. Keep yourself warm, watered and fed as provisions allow.
5 — Take Care of Yourself and Each Other
The final part of the official Land Safety Code, but perhaps the most important, is to take care of yourself and the other members of your group.
If you’re hiking alone, make sure to:
- go slowly and thoughtfully
- pay attention to your surroundings
- watch your footing and make sure each step is sure before taking it
- don’t make rash or panicked decisions.
- watch for early signs of hypothermia (shivering, exhaustion, fumbling, confusion)
- avoid solo river crossings, rapid-flowing water, rock-hopping, active slips etc.
If you’re hiking in a group:
- stop often or at pre-arranged points and wait for others to catch up
- hike at the pace of the slowest hiker and put this person behind the most capable hiker so they can watch & follow them
- check in with each other regularly
- take regular breaks
- encourage each other and keep morale high
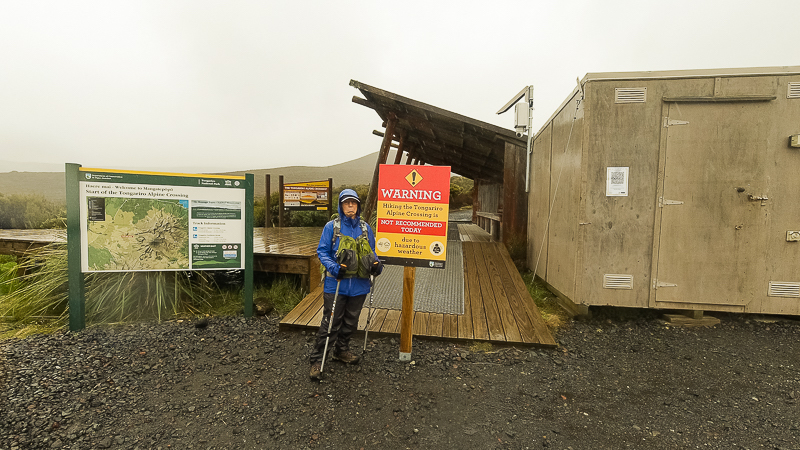
6 — Check Track Conditions
No list of hiking safety tips would be complete without recommending (and insisting) you make sure to do your research thoroughly before you set out on a hiking or tramping trip.
It doesn’t matter how long you’re going for, whether it’s a few hours or a few days, you should always have a really good understanding of what to expect so that you know whether it will be an appropriate trip for you / your group.
Check any Relevant Alerts
Start with the track alerts on the Department of Conservation website for the track you’re planning to hike. If a track alert appears in red at the top of the page, you know you may need to do extra planning or preparation for your trip.
Track alerts contain heaps of helpful information about anything from track closures and recent adverse weather events, to bait drops, hut/campsite closures, availability of fuel & water at huts and campsites or anything else which might affect your trip.
🔥 HOT TIP 🔥
DOC track alerts also show up on the Plan My Walk app and website if you prefer to use that as your main planning & research tool.
After track alerts, the next things you’re going to want to consider are weather warnings. You can find these on the MetService website, under Warnings and Watches. I also recommend you check the Severe Weather Outlook tab, especially if you’re heading out for a multi-day trip.
If severe weather is incoming, absolutely do not head out on your trip unless you have spoken to a park ranger first.
Related to this, if you are heading out onto the trails in the off-season (winter season, between June to October each year) you’ll want to make sure you’re checking the avalanche alerts on the Avalanche Advisory. Scroll to the location of your intended track on the map and see if there is an alert in place.
And finally, if you’re planning on heading to a volcanically active area to hike or tramp, you’ll want to check the volcanic alert levels and follow any relevant guidance on the GNS website.
Visit or Phone the local DOC Visitor Centre
I personally never go for a hike in a new region or national park without first stopping in at the local Department of Conservation Visitor Centre to check current track and weather conditions.
Visitor Centres are one of the best resources we have as trampers in New Zealand. The equivalent of park ranger offices, they’ll have the most accurate and up to date information on track and weather conditions.
The rangers and staff will be able to give you the most accurate advice about what to expect on the trails you’re planning to hike.
As an added bonus, you can also register your trip plans with them and get suggestions for alternative tracks if the one you’re planning has too many hazards.
Questions to Ask The Rangers at Visitor Centres
- What’s the weather forecast for the time I’m planning to be out? How is that likely to affect my trip?
- Are all the huts/campsites open and do they need to be booked?
- Is there dry firewood and water at the huts and/or campsites I’m staying at?
- Are there bridges over all rivers/streams or will I need to cross a river (by myself if not in a group)?
- How high/fast are the rivers flowing (or likely to flow)?
- Is any part of the track washed out, blocked off or damaged and do I need to take an alternate?
- How well marked is the track (especially around detours)?
- Do I need any specialist equipment (especially if hiking out of season)?
- Are there any other hazards that I need to be aware of (bait drops, avalanche hazards, high river levels, flooding etc.)?
Researching Non-DOC Trails
If you’re hiking a private or non-DOC trail then you’ll need to put in a bit more effort to research current track conditions.
Check either the main website for the track you’re attempting or ask a local or regular hiker of the track on an online tramping forum. Just be prepared that this information may not be 100% accurate.
7 — Always Pack the 10 Essentials
You should always pack and prepare for an overnight trip, even if you’re only going for a day hike. Why? Because you just never know what might happen.
You could step off the track for a second to go to the toilet, and twist your ankle or take a bad fall.
You could get lost returning from your toilet location. Or get so distracted by the scenery that you don’t realise you’ve wandered off-trail.
The risks rise exponentially if you’re on your own, so it pays to take extra precautions by always packing the 10 most important hiking backpack essentials. This hiking safety equipment could save your life, and should be in your backpack regardless of if you’re going out for two hours or two months.
8 — Hone Your Skills with Courses
If you have the opportunity and means to get yourself onto some skill training courses before you head out on your adventure, I highly recommend doing so. These courses help to develop and hone your backcountry skills by increasing your awareness of things which could go wrong, how to deal with them and (more importantly) how to avoid them.
In New Zealand, Outdoor Training New Zealand have some fantastic skills courses offered throughout the year at various locations which I highly recommend:
River Safety Training Course — I took this course before I started my Te Araroa thru hike and I highly recommend it. It helped me understand the hydrology of rivers and their hazards so I can better assess whether and where to cross.
Navigation & Compass Skills Course — A practical introduction to map reading, compass use, and GPS skills to help you find your way on the trails.
Survival Skills Course – A two-day immersive training course which will help you develop basic survival skills to prepare you for how to stay safe while hiking and what to do if things go wrong (i.e. if you get lost or injured).
First Aid — Not provided through OTNZ, but rather through organisations like St John and Red Cross. You may consider taking a dedicated outdoor first aid course through someone like First Training NZ or Peak Safety.
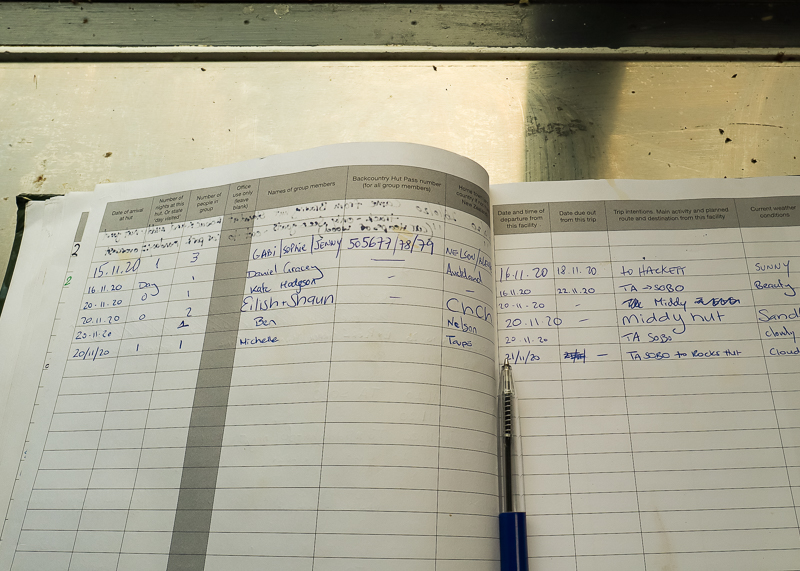
9 — Always Use the Hut Intentions Books
Any Land Search and Rescue personnel member will tell you that one of the most important resources they use to find and locate people who have gotten into trouble in the outdoors are the Hut Intentions Books.
It’s really nice to get to a new hut and record the fact that you were there. And similarly, it’s a wonderful tramping pastime to while away the hours in the evening reading through the previous entries and colourful comments.
There’s plenty of space to outline your plan for the upcoming day so don’t skimp on it. Writing down the track(s) you intend to take, what the weather is like, and where you intend to end up is very important if someone has to come looking for you.
🔥 HOT TIP 🔥
I also include any side-trails I intend to take and/or where I intend to stop for lunch just in case something happens while I’m there.
Take note of other people you come across, talk to them and tell them your plans (and have them do the same). This ‘backcountry grapevine’ can really increase your chances of being found if you get lost, so don’t be shy! Stop and say, hi!
10 — Know When To Turn Back
Sometimes the most important decision you can make when on a tramping trip is the decision to turn back if it’s not safe to continue.
Even the most experienced trampers can be caught out by situations they weren’t anticipating, e.g. a river or stream which has risen rapidly, or a tree or landslide which has blocked the track.
For some of these hazards, it’s possible to upskill yourself so you’re better equipped to deal with them in the moment.
But sometimes the best (and only safe) option can be to turn around and go back the way you came. Many tramping trips have ended this way, but it’s always better to be safe than sorry.
A Note on Social Pressures
Don’t be tempted to fall into the “If they’re doing it, it must be okay” trap.
Just because you see someone else scrambling up a rocky face on the side of a mountain in shorts and singlet with only a small bottle of water doesn’t mean it’s ‘safe’ to do so. You don’t know what their experience level is, and you could put both of you in more danger.
Don’t do something you’re uncomfortable with, just for the social gratification.
Avoid the temptation to attempt a track or trail that’s way beyond your capabilities, just because you want to get ‘that’ instagram pic, or because all your friends have done it. Assess your own abilities, the track conditions at the time, and make an assessment about whether it’s safe for you to do so.
Don’t rely on the “experts” to negate your own responsibilities.
I don’t mean the paid, trained and truly expert guides. I mean that person in your group who you believe is way more experienced than you and knows what they’re doing because they’ve done this hike or that trail. You’re the only person responsible for your safety out there, don’t rely on the ‘expertise’ of others to pull you through if the proverbial hits the fan.
Final Thoughts: NZ Hiking Safety Tips.
This post of ten hiking safety tips is designed to help keep you safe and comfortable on the vast network of New Zealand tracks and trails, but also to be a starting point for safety rules for hiking wherever you are in the world.
By following the advice given in this post, you should not only be well prepared for whatever trail safety conditions throw at you, but you should also be equipped to deal with incidents in a safe manner for you and all members of your group.
If you enjoyed this post about hiking safety in New Zealand, please take a moment to help me spread the word to other trampers and hikers by sharing it on Pinterest or social media.