
Long White Gypsy uses affiliate links and is a member of the Amazon Services LLC Associates Program. If you make a purchase using one of these links, I may receive a small commission at no extra cost to you. See my Privacy Policy for more information.
Te Araroa is unique from the world’s other long distance hiking trails. NZ weather and conditions are rough, rugged and harsh, meaning that thru hikers require specialist gear capable of withstanding those conditions.
As a kiwi (and past Te Araroa hiker) I have a unique knowledge and understanding of NZ hiking conditions enabling me to come up with this ultimate Te Araroa gear list for your upcoming thru hike.
Keep scrolling to find out exactly what you need to carry on this trail (including the reasons why). And when you’re done, check out how to adapt this gear list for the South Island section of Te Araroa.
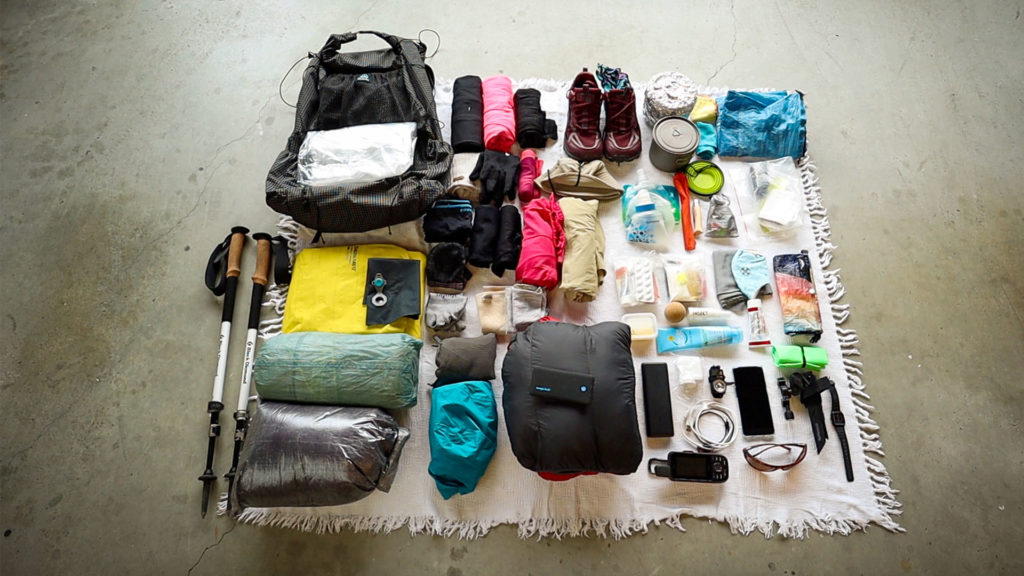
TE ARAROA GEAR LIST
Gear lists can change drastically on a thru hike. Check out my complete Te Araroa Gear list (incl. final pack weight) by clicking here.
Big 3.
Pack
My chosen pack for the TA is the ZPacks Arc Haul. It weighs 687g which includes two hip belt pouches. Unlike the Arc Zip, it’s designed to carry heavier loads of up to 15kg.
The slightly larger 62L capacity has a roll-top closure, meaning that on days where my pack isn’t full to the brim, I don’t have to worry about ‘dead space’.
The frame has a mesh insert, and Zpacks’ patented ‘Flex Arc’ design gives me an air gap between my back and the pack for airflow on hot summer days.
The main fabric is 4.85oz/sq yd DCF Gridstop fabric (durable and rip resistant) and its fully seam taped with a waterproof coating on the inside making the pack highly water resistant so I don’t need to worry about a rain cover.
Pack Liner
I began using a standard household black bin bag as a pack liner, but later swapped out to a Nyloflume liner which I bought from Enlightened Equipment.
I use these rather than proper dry bags, largely because they’re lighter (my Sea to Summit pack liner weighs a staggering 150g!), but also because they’re much easier and cheaper to replace on trail if there are any issues.
I ordered a pack of two Nyloflume liners so I don’t have to wait for shipping if one developed a puncture, rip or tear.
If you’re from America, note that NZ bin bags are typically not as thick as trash compactor bags.
Sleep System
Enlightened Equipment Enigma 12C/10F Quilt
I decided early on that I wanted a quilt rather than a sleeping bag. I’ve always used my sleeping bags like quilts anyway, so it just made sense. But also, I liked the weight and versatility of quilts. And Enlightened Equipment seem to have thought of everything. Their quilts feature clips along the back so you can minimise draughts on cold nights, a drawcord around the neck for the same purpose, and a fully sewn in footbox to keep my feet toasty warm. It also has DWR coated hydrophobic down to repel moisture from condensation. I pack all of this into a Sea to Summit waterproof compression bag for the duration of the hike bringing the total weight of my quilt to 750g.
Therm-a-Rest NeoAir XLite (Womens) Sleeping Pad
The womens’ version of this popular pad is slightly shorter and a little narrower than the standard. But it also has a much higher R-rating (R4.2 (standard) vs R5.4 (womens)). As with most of Therm-a-Rest’s other pads, the NeoAir XLite features horizontal baffles for more stability and a tapered design to maximise comfort to weight ratios. To minimise weight, I ditched the stuff sack and rolled the pad up secure with some elastic bands instead.
Therm-a-Rest NeoAir Pump Sack
I like to look after my gear to ensure it lasts as long as possible. One of the biggest issues with inflatable sleeping pads is that over time mold can start to build up inside because the warm air from your breath condenses on the inside as you inflate. Aside from potentially shortening the life of your pad, this could also have detrimental health effects over time, so I decided to splash out on a pump sack at an extra 97g.
Trekology Inflatable Pillow
The first of my luxury items is an inflatable pillow. I tested and used this pillow on my Whirinaki Track shakedown hike and found it surprisingly comfortable. Many people use their down jackets or extra clothing inside a stuff sack as a pillow to save weight, but I knew that my tendency to sleep cold meant that I’d probably be wearing my jacket to sleep in. The Trekology pillow weighs just 82g and is well worth the weight.
Shelter
ZPacks Duplex
When it came to a lightweight shelter for my thru hike, there really was no other choice than the Duplex. At only 610g (721g including the stakes) it’s one of the lightest on the market. The stable a-frame design uses trekking poles to set up, and can be erected with a minimum of 6 stakes. I bought 8 Zpacks Titanium V stakes to go with it. I chose the Spruce Green colour as it’s made from slightly thicker DCF making it slightly more durable & waterproof (20,000 mm HH as opposed to 15,000 mm HH on the standard blue version). The double thickness DCF bathtub floor has a high waterproof rating as well. I love the double vestibules for added convenience and the tent has plenty of space inside and out for all my gear.
Cascade Mountain Tech Carbon Fiber Trekking Poles
I can’t recommend a more budget friendly brand of trekking poles for thru hikers than these. Coming it at just under USD$50 (NZD$80) for the pair, the Cascade Mountain Tech carbon fiber trekking poles with cork grips are well under half the price of many big brand trekking poles. With easy to use quick locks and rubber bungs for the end (much nicer for road walking) these are a great budget friendly option for thru hikers.
Prefer checklists? Get access to my complete suggested gear list for New Zealand’s Te Araroa here.
footwear & Clothing
Altra Lone Peak 3.5 Trail Runners
Altra trail runners have long been the footwear of choice for thru-hikers. Well known for their zero-drop platform and wide toe boxes, Altras are a great option for hikers of all foot shapes and sizes. I decided to go with Altra as they provide more room for my toes to naturally splay and move whilst hiking, creating less friction (and hopefully less blisters). Altra are known for their ‘zero drop’ shoes, meaning that there is no height difference between the toe and heel. Sometimes this can cause issues for people (e.g. plantar fasciitis) and I experienced some heel pain myself after 4 days hiking in them, so I added a pair of orthopedic insoles with some extra arch and heel support and never looked back.
Dirty Girl Gaiters
Dirty Girl gaiters are very popular on American long distance trails but you can also purchase similar styles from Altra, Outdoor Research and other companies. Gaiters reduce the opportunity for dust, stones and other small particles to enter shoes, therefore preventing friction and (hopefully) blisters. With all the beach walking on Te Araroa, and plenty of loose terrain, I’m hoping that these will be a good choice.
Worn Hiking Clothing
The clothing I wore every day on the trail to hike in was:
- Columbia PFG long sleeve shirt
- Basic cotton singlet
- Kathmandu trailhead shorts
- Injinji toe socks
- Smartwool run phD ankle socks (x2 pair)
Insulation & Warmth
For warmth, both at night and during the day, I wore:
- Macpac Icefall Jacket
- Macpac Prothermal leggings – To sleep in.
- Macpac merino long sleeve shirt – To sleep in.
- RAB Powerstretch Gloves – Essential for keeping fingers warm on those cold evenings.
- Macpac Ultrafine Merino beanie – To wear at camp at nighttime.
Rainwear
New Zealand weather is renowned for being changeable. To keep myself dry and comfortable even in inclement weather, I used:
- Macpac Traverse Jacket – Slightly heavier duty than other lightweight options, for that tough NZ bushbashing environment, this jacket still has a 20,000mm HH and is guaranteed to keep me as dry as possible.
- Macpac Hightail Paints – Made from lightweight gridstop fabric, unfortunately these 20,000mm HH rainpants weren’t durable enough for the trail but were very waterproof while they lasted.
Miscellaneous Clothing Items
Some extra clothing & miscellaneous items I carried include:
- Light cotton singlet to sleep in on warm nights
- Sunglasses (Skechers Polarised) – lightweight and flexible, sunglasses are a must for the harsh New Zealand sunshine.
- Buff – From headbands to scarves, hats, beanies, cloths, sweat bands and much more, there are so many different uses for a buff.
- Handkerchiefs – A low waste and reusable alternative to tissues.
- Spare underwear (x2 pair)
Towel & Flannel
A full sized normal towel is far too heavy & bulky for a thru hike so I improvised a trail towel from a couple of household rags sewn together and a smaller version for a flannel. Weighing in at approx. 30g per rag, they were a very lightweight option but not really that practical, so I swapped out for a Sea to Summit Airlite towel in Auckland.
Camp Shoes
Although jandals (flip flops) are cheap & lightweight, they’re renowned for breaking under heavy use so instead I used a pair of Crocs Swiftwater sandals as my camp shoes. They weigh 244g, so definitely not the lightest option, but were more than comfortable enough for wandering around at camp and in town on my zero days.
kitchen
Cooking System
In terms of cooking gear, for weight and efficiency i’ll be carrying:
- Toaks Titanium 900ml pot – Toaks stuffsack removed and stored in a homemade pot cozy
- Homemade Pot Cozy – Weighing a little over 40g, being able to soak my pre-dehydrated meals in my pot rather than ‘cook’ them on the stove was more fuel efficient and reduced my cooking time.
- Fuel Canister – For the most part I carried standard 227g iso-propane fuel canisters, this being the best size for my needs.
- MSR Pocket Rocket II Stove – With a boil time of just under 2 mins, this 76g stove is one of the most efficient on the market
- Toaks Titanium Long Handle Spoon
- Sea to Summit X-Mug – Because I love a cup of tea with my breakfast in the morning.
- Stainless Steel Tea Ball – For making my morning cuppa low-waste
- Sawyer Squeeze (plus cleaning Syringe & 32oz collection pouch) – For collecting & filtering water. With its 0.1 micron absolute filtration, the Squeeze filters up to 99.999999% of all bacteria and as an added bonus, 100% of all microplastics.
- Bic Mini Lighter
- Zpacks Large DCF Food Bag – This large size food bag was sufficient for storing all of my meals on the trail, with the added benefit of being waterproof and highly durable to discourage those pesky critters.
- Gerber Neck Knife – With a variety of uses, my Gerber neck knife was invaluable for cutting blocks of cheese to a self-defence deterrent.
prefer to watch?
Watch the video version of this Te Araroa gear list by clicking play below.
Toiletries
Toilet Paper & Deuce of Spades Trowel
I carried a flattened complete roll of toilet paper and a Deuce of Spades trowel for all my toileting needs. I also addressed my phobia of long drop toilets by carrying a small roll of compostable dog poop bags.
General Toiletries
Toiletries are, of course, personal to everyone so each person’s list will be different. But to give you some idea, here is a list of the toiletries etc. I carried with me:
- Sleeping Mask
- Razor
- Nail clippers
- Bobby pins
- Stress Med Relief Spray
- Hand sanitiser
- Earplus
- Floss
- Nail file
- Sunscreen
- Insect repellent
- Hairbrush
- Toothpaste
- Feminine products
- Hygiene products
- Vaseline
- Soap
First Aid
You should ensure you have a sufficient first aid supply to cover most of the daily injuries and ailments you’re likely to experience on trail. For more serious injuries consider taking a First Aid course before you go, and always make sure to carry a PLB.
- Ibuprofen
- Personal medications
- Dermabond superglue
- Immodium
- Survival blanket
- Parecetamol / Panadol
- Plasters
- Electrolytes (spare)
- Leukotape
- Antiseptic cream
- Steri strips
- Lemsip
- Thermarest field repair kit
Electronics
My electronic equipment was some of the heaviest in my pack, but as I was vlogging along the way I needed most of it! Of course, many of these items are not necessary for a typical thru-hiker.
iPhone 6 Plus (in Lifeproof Case)
My iPhone 6 Plus was an old model, but the best camera is the one you have with you! I protected it (rather unsuccessfully – see what I mean here) from the elements as much as possible with a Lifeproof Fre case.
iPad Mini & Apple Pencil
So that I could edit and post videos on trail, I began by carrying my iPad mini and apple pencil and then quickly ditched them after 90 Mile Beach!
Garmin GPS Map 66i
I carried both the GPS Map 66i and the ACR Resqlink beacon on this hike. Many people asked me why I carried both. Firstly, I wanted to be able to message my parents from anywhere. This was not only for their peace of mind, but also to help me if I had an unexpected anxiety attack. Second, the SOS function on the GPS Map 66i works differently to the ACR beacon and I wasn’t confident that it would be as reliable. The beacon acted as my first and most reliable method of sending for help.
Black Diamond Spot Headlamp (+ Spare Batteries)
The Black Diamond Spot is affordable, lightweight, and powerful for its small size. It’s powered by 3 x AAA batteries which I could replace easily wherever I was on trail, and has a range of functions including a flash and a red light.
Anker 20,100 maH PD Powerbank
To keep my electronic devices working, I also carried a high-capacity 20,1000 maH Anker powerbank. I could get about 4-6 iPhone 6 charges from the battery, which helped over some of the longer sections. And of course I didn’t forget my iPhone and GPS device charging cables.
Cygnett PD USB Charger
To help charge my powerbank faster when I’m in town I purchased a special power delivery (PD) charging brick. The power delivery charger charged my Anker powerbank in a shorter period than the usual 10hrs meaning I could free up a socket for another hiker to use.
Apple Earpods + Lapel Microphone
I packed a lapel microphone for better audio on my videos and my Apple Earpods were valuable not just for listening to music and podcasts on the trail, but also as a backup microphone.
miscellaneous
The last items on this list are ‘miscellaneous’ items which don’t really fit into any other categories. Some of them are what I would consider ‘luxury’ items.
- Therm-a-Rest ZSeat – A smaller version of the popular ZLite sleeping pad, made by the same brand. Ideal for keeping my bum comfy, warm and dry on rest and lunch breaks.
- Silva Compass – For emergency use only as a last resort (as I don’t have any compass skills).
- Crossword Puzzle Book & Pen – For early nights at camp.
- Joby Gorillapod 325 – To keep those all-important shots nice and steady. And to feature in my own videos when there’s no one else around!
Conclusion
Even experienced kiwi trampers are caught out and perish on NZ’s trails every year, so don’t become another statistic. This Te Araroa gear list is designed to be comprehensive enough to ensure you’re well prepared for New Zealand’s tough and rugged thru hiking conditions.
If you found this Te Araroa gear list breakdown helpful, please take a moment to help me spread the word to other trampers and hikers by sharing it on social media.

